- Overview
- Supported Functionality
- Before You Begin
- Install ShipperHQ Plus
- Installing the App
- Migrating from Standard ShipperHQ App
- New Installation
- Switch On ShipperHQ Plus Rating
- Troubleshooting
- No Rates are Returning at Checkout
- ShipperHQ Plus Not Visible in Shipping Zones
- Quoting for Out of Stock Products Using B2B Edition
- Custom Shipping for B2B Edition
Overview
Our ShipperHQ Plus app for BigCommerce enhances your store with advanced functionality that goes beyond our standard ShipperHQ BigCommerce app. To access ShipperHQ Plus, ensure you have an Advanced or Enterprise ShipperHQ Account Plan. For upgrade details, reach out to CustomerSuccess@shipperHQ.com
Supported Functionality
ShipperHQ Plus expands on the Standard BigCommerce app with additional capabilities, including:
- Delivery Date Picker/Calendar and enhanced In-Store Pickup experience via ShipperHQ Enhanced Checkout
- Coupon Code-based Shipping Rules
- Support for BigCommerce's control over Countries and States/Regions in Checkout Dropdowns through BigCommerce Shipping Zones
- Improved support for BigCommerce B2B Edition Custom Shipping
- Integration with BigCommerce B2B Edition Customer Groups
Before You Begin
ShipperHQ Plus utilizes Product Metadata in BigCommerce to define attributes like the origin or shipping group. Since BigCommerce doesn't natively support Product Metadata management, you can use a third-party tool for this purpose.
Consider these apps for managing product metadata:
- Hypa's Metafields Manager (paid app, free trial available)
- Metafields Editor by Groove Commerce (free app)
We recommend backing up your product metafields using the export feature of these apps before starting.
Install ShipperHQ Plus
Installing the App
- ShipperHQ Plus isn't listed in the BigCommerce Marketplace. Contact ShipperHQ for access.
- Follow the provided link to ShipperHQ Plus, ensuring you're logged into the correct BigCommerce Account and Store.
- Click "Install" on the ShipperHQ Plus app.
- Confirm PCI-DSS compliance and click "Confirm."
- You'll be taken to your existing ShipperHQ configuration once installed.
Migrating from Standard ShipperHQ App
If you already use the Standard ShipperHQ App, you need to install ShipperHQ Plus and migrate your ShipperHQ-related product properties.
ShipperHQ Plus can coexist with the Standard App. It will continue to function and provide rates until you switch to the ShipperHQ Plus app for rating.
Migrate Product Metadata
- Optionally, install a trial of Hypa's Metafields Manager or similar.
- Optionally, use the export feature to back up product metafields.
- Open the ShipperHQ Plus app.
- Select "Migrate Product Metadata" from the Account menu.
- When migration completes, verify metafields in a few products:
- 'Shipping Groups' should now be in shipping_carrier_286 - shipperhq_shipping_group metafield
- 'Origin Locations' should be in shipping_carrier_286 - shipperhq_warehouse metafield
- 'Dimensional Rules' should be in shipping_carrier_286 - shipperhq_dim_group metafield
- 'Availability Date' should be in shipping_carrier_286 - shipperhq_availability_date metafield
⚠️ Availability Date Metafield - ShipperHQ accounts for each product's availability date when calculating calendar-based rates or delivery dates. This feature allows merchants to manage pre-orders, backorders, or sold-out ordering effectively.
⚠️ For merchants on BigCommerce using Fixed Shipping Fee feature, ensure Fixed Shipping Fee attribute should be in shipping_carrier_286 - shipperhq_shipping_fee metafield.
New Installation
If not using the Standard ShipperHQ App, you can directly install ShipperHQ Plus and configure your shipping requirements via your ShipperHQ account, using the Test Your Rates tool for validation.
Ensure to configure metafield values using your metafield management app.
Metafield namespace: shipping_carrier_286
- Shipping Groups:
key: shipperhq_shipping_group - Origin Locations:
key: shipperhq_warehouse - Dimensional Rules:
key: shipperhq_dim_group - Dimensional Rules:
key: shipperhq_availability_date
Adding New Products, or updating current Product, after Migrating to ShipperHQ Plus
If you’ve already migrated from the Standard ShipperHQ app to the ShipperHQ Plus app and completed the metafield data migration (as outlined above), you’ll need to set up product attributes for any new or updated products.
The recommended method is to configure these metafield values through your preferred metafield management app.
Switch On ShipperHQ Plus Rating
Once installed, and product metadata is migrated as needed, you can transition to rating with ShipperHQ Plus.
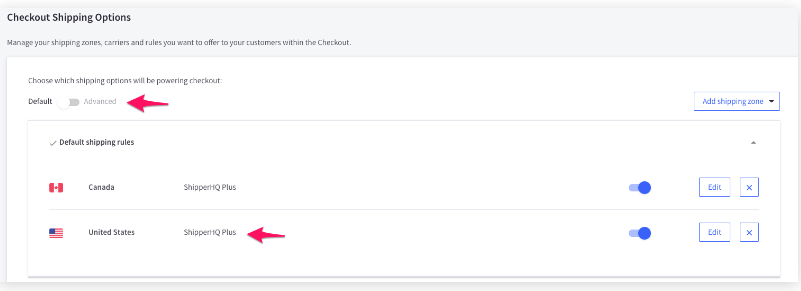
- Go to Settings -> Shipping in your BigCommerce store.
- Configure Default Shipping Rules, establishing at least US and Rest of World zones, enabling ShipperHQ Plus as a carrier.
- Use the Quote tab for testing connectivity and rates.
- Transition to the new service upon zone configuration:
- If using Standard ShipperHQ: Toggle from Advanced to Default shipping rules. To revert due to issues, toggle back.
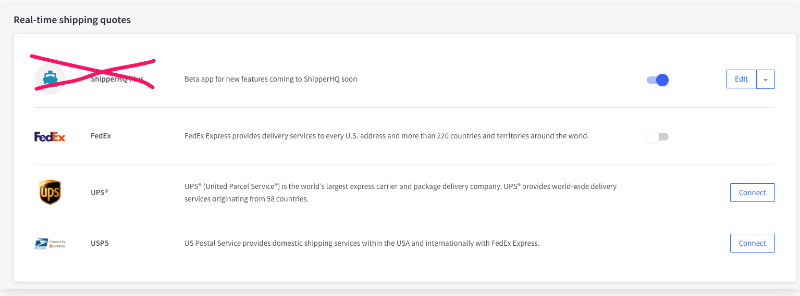
- If not previously using Standard ShipperHQ: Disable previous Carriers/Rates and verify ShipperHQ rates.
After these steps, ShipperHQ Plus should be active, allowing access to the SHQ dashboard for further setup. If applicable, leave the previous app installed for backup.
Troubleshooting
No Rates are Returning at Checkout
Ensure your Checkout Shipping options in BigCommerce are set to Default, and ShipperHQ Plus is added to all Shipping Zones. Confirm the ShipperHQ Plus configuration is correct, and metadata is correctly migrated.
ShipperHQ Plus Not Visible in Shipping Zones
Uninstall and reinstall the ShipperHQ Plus App.
Quoting for Out of Stock Products Using B2B Edition
For quoting shipping on out-of-stock products with B2B, note that out-of-stock products list as 0 Lbs. To workaround, manually add a weight in quotes or replace the product in the quote editor.
For more guidance, refer to this article from BigCommerce.
Custom Shipping for B2B Edition
For B2B Custom Quoting, ShipperHQ Plus is required.
Please refer to this article from BigCommerce.