Overview
Setting up your website in ShipperHQ gives you the credentials needed to connect your Magento ShipperHQ extension. This document guides you through the basic steps to connect with ShipperHQ and other available configuration options.
Table of Contents- Overview
- Before You Begin
- Connecting ShipperHQ Account to Magento
- Configuring Extension Settings
- ShipperHQ Configuration Options
- Advanced Settings Panel
- Standard Shipping Panel
- FAQ
Before You Begin
- Ensure you have installed the ShipperHQ module on your Magento 2 store
- After installation, flush the cache on your Magento 2 store
- Create a Website on your ShipperHQ configuration
Connecting ShipperHQ Account to Magento
- Obtain your API Key and Authentication Code from ShipperHQ by logging into your account and navigating to Websites. Edit the website configured for this store and go to eCommerce Configuration.
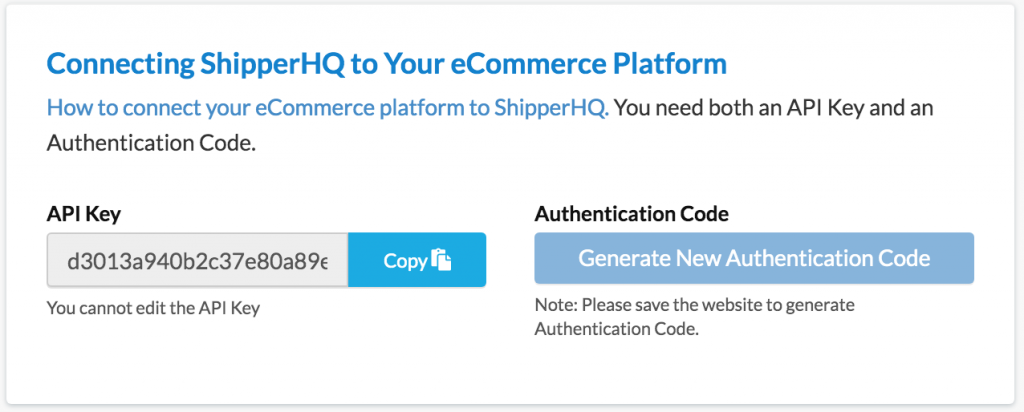
- Enter the API Key and Authentication code into the associated fields in the extension settings within your Store Configuration options in the Magento 2 admin. These options are found at
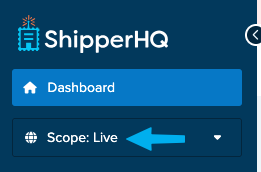
Stores > Configuration > Sales > Delivery Methods > ShipperHQ. - Ensure the Environment Scope dropdown matches your ShipperHQ environment scope setting with the Scope used for your API and Authentication codes.

- Set the Enabled dropdown to "Yes" and disable all other shipping methods in Magento to prevent unexpected results at checkout.
- Save the store configuration settings.
If you have multiple websites running different ShipperHQ configurations, create each website in ShipperHQ and collect the API Key and Authentication code. Then, within the Shipping Methods > ShipperHQ website settings, uncheck the "default" setting and override the API Key and Authentication code for each of your websites.
Configuring Extension Settings
💡 Please note: Unless directly advised by ShipperHQ, the Sandbox mode must be set to "No." Enabling Sandbox mode will show that SHQ is not contactable.
ShipperHQ Configuration Options
- Main Shipping Carrier Title: Carrier title displayed when no other title is returned from ShipperHQ
- Environment Scope: Match the environment scope configured in the ShipperHQ dashboard
- API Key: Unique identifier in ShipperHQ for your website
- Authentication Code: Unique code to authenticate this website with ShipperHQ
- Backup Carrier/Method: Select a standard Magento shipping carrier to act as a backup in case ShipperHQ is not responding
Advanced Settings Panel
- Custom Shipping Rates in Admin: Allow admin users to set a custom shipping rate when placing orders via the admin panel
- Hide Carrier Notifications At Checkout: Hide notifications if carriers include additional information with rates
- Display Transaction ID: Enable this setting for debugging if advised by ShipperHQ support
- Require Meaningful Address to Request Rates: Request shipping rates only if a zipcode is entered at checkout, reducing API requests
- Enable Caching of ShipperHQ Rates: Allow ShipperHQ to cache shipping rate requests to minimize API requests
- Timeout (seconds): Set the timeout period in seconds before calling the backup carrier
Standard Shipping Panel
- Calculate Handling Fee: Handling fee type
- Handling Fee: Enter fee or leave blank for no fee. Note: this will surcharge all shipping rates returned by ShipperHQ. For more granular control, handling fees can be applied within the ShipperHQ dashboard.
- Ship to Applicable Countries: Limit ShipperHQ to selected or all countries
- Ship to Specific Countries: Select applicable countries for ShipperHQ carrier
- Show Method if Not Applicable: Display notification from ShipperHQ if no rates are returned
- Sort Order: Determine the order of ShipperHQ rates in Magento
- Displayed Error Message: Text shown if ShipperHQ does not return a response
- Debug: Enable additional logging and frontend display to assist in debugging
FAQ
Why does "ShipperHQ" appear as the carrier name at checkout instead of the actual carrier?
The Main Shipping Carrier Title field in your Magento 2 ShipperHQ configuration defaults to "ShipperHQ." This label appears at checkout when no specific carrier title is returned.
To fix this, go to Stores > Configuration > Sales > Delivery Methods > ShipperHQ and update the Main Shipping Carrier Title to a neutral label such as "Shipping" or "Shipping Options."