- Overview
- Strategy 1: Start with "Hard-To-Ship" Products
- Strategy 2: Add Master Boxes for Case-Packed Items
- Strategy 3: Use Known Packing Information to Create Rules
- Strategy 4: Set Up Default Packing Boxes
- Strategy 5: Assign Maximum Weights to Boxes
- Summary
- Related Articles
TLDR:
-
Start with your hardest products to ship. That’s where dimensional packing helps the most.
-
Use best-fit boxes and pack-separately rules for large or fragile items.
-
Add master boxes for case-packed products like wine or skincare.
-
Set default boxes and weight limits so your rates stay accurate, even with limited product data.
-
The goal is simple: improve dimensional weight accuracy, reduce wasted space, and protect your bottom line.
Overview
If your shipping rates never seem to match reality, dimensional packing can fix that. Instead of rating orders by weight alone, it uses volumetric weight to calculate how much space your products take up while shipping.
The result is a smarter and predictable shipping strategy that reflects what actually happens in your warehouse.
You don’t need a perfect dataset of product dimensions to start. You just need a plan that fits your business. Here are some strategies to help you implement this feature, save money, and enhance rating accuracy. 😊
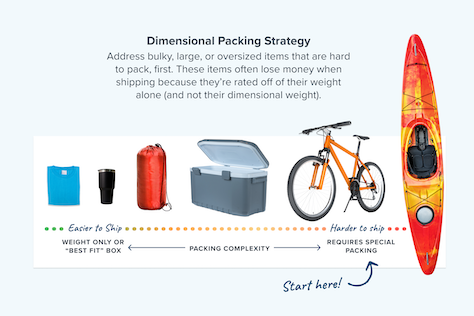
Strategy 1: Start with "Hard-To-Ship" Products
Your product catalog might be vast and varied, but you don't need to tackle everything at once. Begin with large, bulky, or oddly sized items that often lead to shipping losses when rated by weight alone, rather than considering their dimensional weight or specific packing needs.
Approach 1: Use Best-Fit Boxes
Add dimensions to these products so ShipperHQ can select the right box automatically.
The best-fit box algorithm ensures every order is packed efficiently and rated accurately using dimensional weight instead of just scale weight.
Approach 2: Pack Separately
Some products should never share a box. Bikes, lamps, and gym equipment are good examples.
Create a "Pack Separately" rule so each item gets its own packaging. This improves protection, simplifies fulfillment, and keeps shipping charges in check.
Strategy 2: Add Master Boxes for Case-Packed Items
Products that ship in set quantities, such as beverages or cosmetics, work best with Master Packing Boxes.
For example, if you sell wine in boxes of 12, ShipperHQ will automatically fill one box with 12 and start a new one for the rest.
Strategy 3: Use Known Packing Information to Create Rules
If you're aware that a set of "Wings" ships in 3 boxes, assign these to a "pack into multiple fixed boxes" packing rule. Define your fixed boxes by size, weight, and quantity, so when "Wings" are in the cart, the packing and rating are based on these fixed boxes.
Strategy 4: Set Up Default Packing Boxes
If not every product has dimensions yet, add your most common box sizes with Can Be Used to Pack All Products enabled.

This allows ShipperHQ to apply your packing logic to as much of your inventory as possible. You can update or refine this setup later as you collect more data.
Strategy 5: Assign Maximum Weights to Boxes
Assign different maximum weights to a range of packing boxes available for "Pack All Products." ShipperHQ will choose the packing method for best-fit boxes based on the cart's weight.

Summary
Remember, Dimensional Packing is a tool to refine rating accuracy, and the more you fine-tune, the better your results will be.
Start small and save money sooner rather than waiting for the perfect setup💡. The more you refine, the more you save.
Related Articles
- How to Set Up Dimensional Packing
- How to Define Box Sizes
- How to Set up Packing Rules
- How to configure boxes to be used for all products
- Example: How to pack my product into multiple fixed boxes
- Example: Packing Different Quantities into Set Boxes
- Example: Packing Products into Boxes
- Troubleshooting: Boxes Not Packed as Expected