Overview
Get precise shipping rates by setting up your box and pallet details in ShipperHQ.
With Dimensional Packing enabled, ShipperHQ calculates shipping rates based on how your products actually fit into boxes, not just product weight or dimensions. This means you’ll avoid overcharging or undercharging and show accurate rates at checkout.
This guide explains how to set up and define boxes, box sizes, and pallets in ShipperHQ. Before you start, make sure Dimensional Packing is turned on. Follow the steps below to set up your boxes in ShipperHQ.
NOTE: For multi-item orders, ShipperHQ does not dynamically create boxes based on the combined dimensions of the items. Box packing must be predefined using set box sizes and/or packing rules.
Table of Contents
- Overview
- How to Add Boxes
- Adding Boxes Individually
- Adding Boxes via CSV
- Creating an Example CSV
- Packing in Boxes vs Tubes vs Skids
- Additional Resources
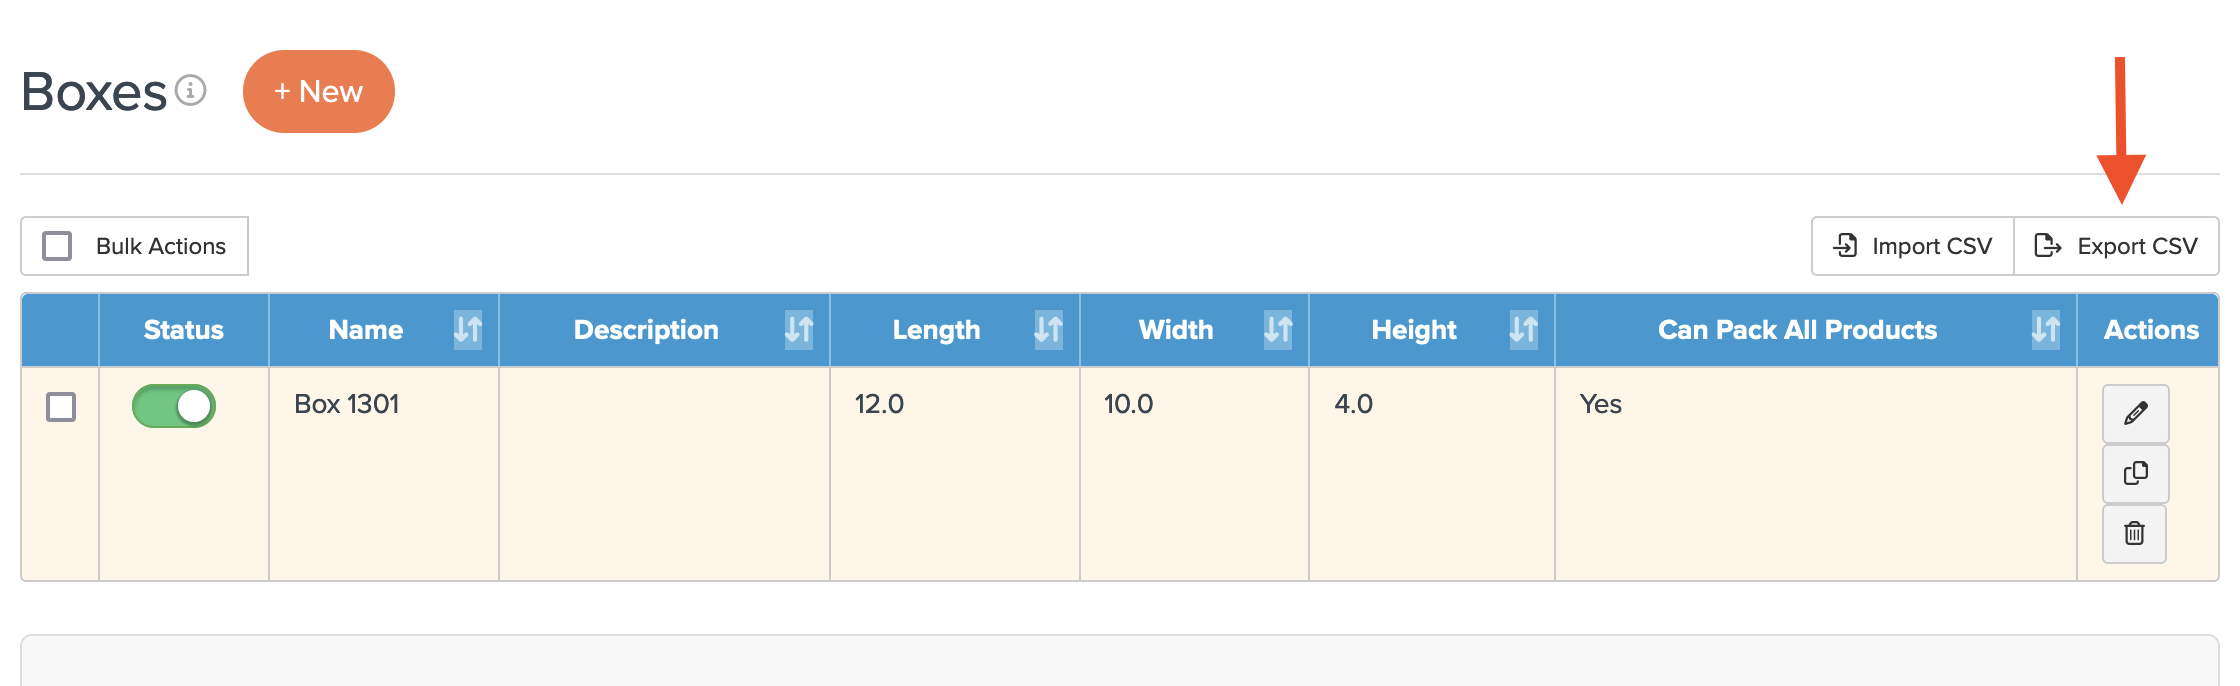
How to Add Boxes

Once Dimensional Shipping is enabled, 'Boxes' will appear in the left-hand navigation under Manage Shipping. Here, you can define boxes either individually or by bulk CSV import.
Adding Boxes Individually
To add a box individually, navigate to Boxes, click +New, and follow the steps below. To bulk upload boxes, skip to: Adding Boxes via CSV.
Complete Fields in "Basic" Tab

When you create a new box, the Basic Panel will open up. Follow these steps to fill in the fields.
- Name your Box. This name will be returned in the logs to help you identify which box was used to pack a product and get rates. Optionally, you can add an internal description with more detail about what this box is or what it's used for.
- If this box can be available for any of your products to potentially pack into, select the checkbox "Can Be Used to Pack All Products." If not, leave the checkbox blank. When left blank, the box can be used within a Packing Rule.
- If the box is assigned to a packing rule, you won't see this option.
- Define your Box Size. Choose either a custom box size (define your own dimensions) or select from USPS Flat Rate Boxes.
- For custom boxes, define the length, width, and height for a custom box. For USPS Flat Rate Boxes, these fields will auto-populate.
Magento users: When "Can be used to pack all products" is selected, the box won't display in Magento's possible shipping boxes attribute, as it's treated as assigned to all products.
Complete Fields in "Optional" Tab

After filling in the "Basic" fields, navigate to the "Optional" Tab.
Set a max quantity and max weight limit if necessary (e.g., max of 5 items or up to 10lbs). This is entirely optional.
When you select "No Max Qty" or "No Max Weight," ShipperHQ will still consider the physical dimensions of the box and the products in the cart, as well as any custom packing rules, and any carrier restrictions – ensuring items fit within the box's capacity.
Complete Fields in "Advanced" Panel

After filling in the "Optional" fields, navigate to the "Advanced" Tab.
- If this box is only to be used for specific carriers, select those carriers from the dropdown, Carriers this Box Applies to, which populates carriers you've added to ShipperHQ.
- If this box can be available for all your carriers, leave it blank.
- If you'd like to include weight of the packing, such as the weight of extra cardboard, padding, or dry ice, add Packing Weight. This is only necessary if you have heavy packaging material.
- Tip: You can set your weight unit preferences (lbs or kgs) under your account's Global Settings.
- Optionally, you can add a per box surcharge price that gets added to the shipping rate when this box is used.
- Surcharges apply after shipping rules and might show after a free shipping rule. For specific surcharge situations, refer to box-based shipping rules.
- Set a Freight Class for the box if applicable.
- Indicate if you are setting up a Master Box (also called 'Case Pack'). When selected, this box will only be used when the quantity limit set for this box is reached, and the weight limit on this box will be ignored.
- Choose to Ship Skus Separately so only items with the same SKU are packed in this box (by selecting the checkbox), or to allow multiple SKUs to be packed into this box (by leaving the checkbox unchecked).
- Click "Save" and your box is now added to ShipperHQ. Or, select the dropdown on the right side of the "Save" button to select "Save and Edit," "Save and Duplicate," or "Save and Create New."
Master Packing Boxes
You can assign a box as a master pre-packed box, or "case pack". A master packing box ships alone, like when shampoo is sold in boxes of 6, 15, or 30. If a customer orders 8, 6 go in a master box and the remaining 2 can be packed with other items. Learn more about Using Master Packing Boxes.
Adding Boxes via CSV
To upload multiple boxes in bulk, use a CSV. The maximum is 500 Boxes per import. If you have more than 500, split them into separate CSV files.
- Create at least one box in ShipperHQ using the above steps. This sets up the CSV structure.
- After adding a box, use the Export CSV option in the box list's upper right corner. This downloads the list to your computer.
- Open the CSV file to enter remaining box details. Copy data in each column as shown from the first box created manually.

- Once your list is ready, go back to ShipperHQ and select Import CSV from the box list's upper right corner.
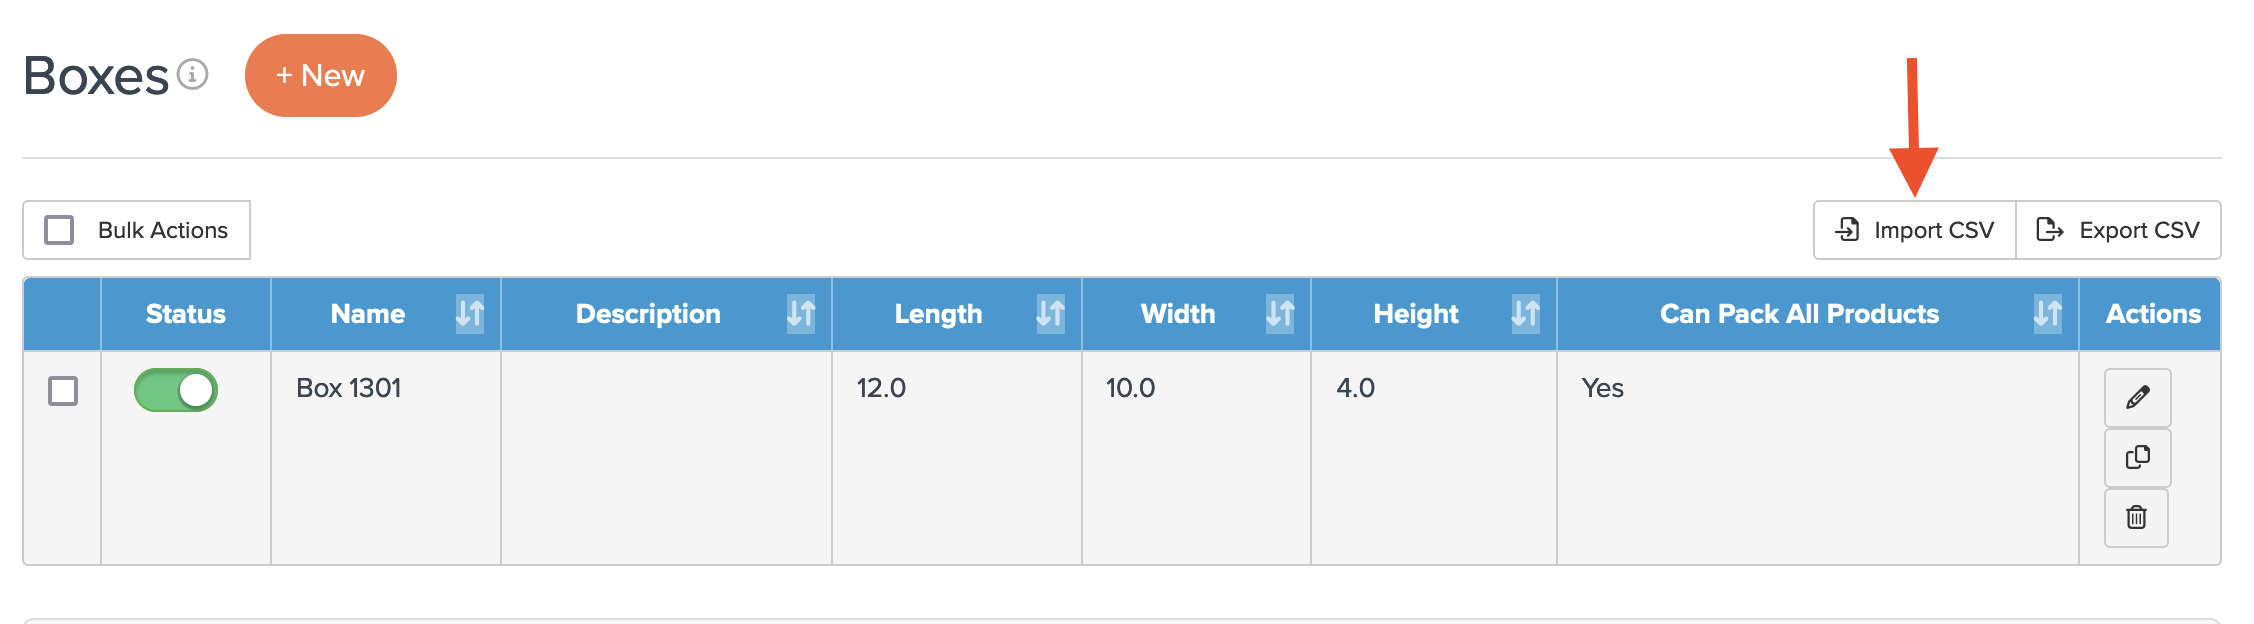
- Choose Browse to locate your CSV file on the computer.

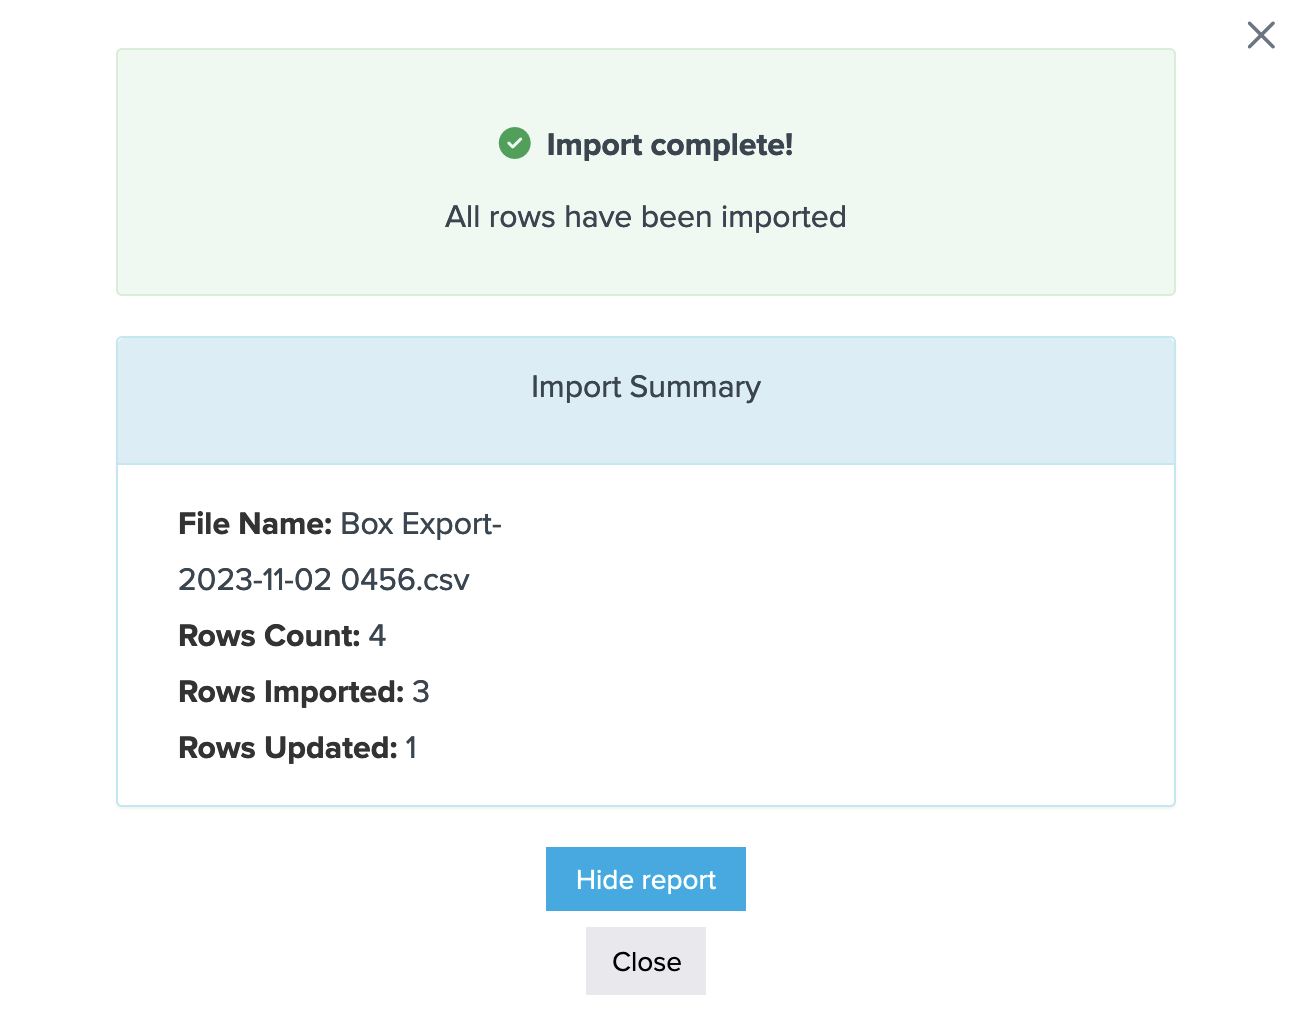
- Select Upload to import. You'll receive a success notification or a list of errors to correct before re-importing.
Creating an Example CSV
In order to make sure your template is accurate before importing, please follow these steps to create an example CSV Box template.
- Create a new Box with simple Dimensions and a simple name

- Export CSV

- The export Headers and simple data should appear like so in your export:

Packing in Boxes vs Tubes vs Skids
ShipperHQ does not offer a built-in feature to categorize packaging types like boxes, tubes, or skids. This article explains how to manage these variations using naming and packing rules.
No Built-In Packaging Type Selection
ShipperHQ does not include a dropdown or field to select specific packaging types (e.g., tube, box, skid). Instead:
-
Packaging type is identified by the name and internal description of each box definition.
-
This allows you to label boxes clearly (e.g., “Tube 36in”, “Skid 40x48”) for organizational purposes.
How to Handle Specialized Packing Needs
If your items require different handling based on packaging type:
-
Use Packing Rules to control how and when specific box types are used.
-
Assign specific boxes to products to ensure they're packed and rated accordingly.
-
Set restrictions or conditions based on box dimensions or item characteristics.
Tip: Use consistent naming conventions like “Tube” or “Skid” in your box names to make them easy to identify.
This is our article for cylindrical packing if needed.
Additional Resources
For additional details on setting up packing rules and using boxes, visit the Packing Rules category of our Knowledge Base. See also:
- How to Set Up Master Packing Boxes
- How to Set Up Packing Rules
- How Packing Boxes work with Packing Rules
- Dimensional Packing: How to Use Packing Rules to Control Box Selection
- Dimensional Packing: Packing Products Into Boxes (Best-Fit)
-