Overview
uShip provides a straight-forward, high-quality option for nationwide in-home furniture delivery services via a set of carefully vetted carrier partners. By connecting your ShipperHQ account to uShip you’ll be able to offer real-time rating for In-Home Furniture Delivery on your eCommerce site. On some eCommerce platforms, you can also create uShip listings automatically or manually using ShipperHQ to help ensure a seamless end-to-end experience for you and your customers.
Learn more about uShip In-Home Delivery on the ShipperHQ Marketplace.
Platform
uShip Rating functionality is available on any platform supported by ShipperHQ. With this capability, you can offer your customers real-time rates with uShip In-Home Delivery.
uShip Listing functionality is currently supported for:
-
- Magento 2: You must be using version 20.30.0 or higher of the ShipperHQ Magento 2 extension. No additional modules are required beyond the standard ShipperHQ extension
- BigCommerce (automatic listing only)
- Shopify (automatic listing only)
Requirements
These are the credentials necessary in order to validate your account with ShipperHQ for real-time rating. If you already have an account, contact your sales representative to obtain the following:
- A registered account with uShip
- Your Username & Password for that uShip account
- In order to use the uShip In-Home Delivery carrier in ShipperHQ you will need to have the ShipperHQ Dimensional Packing Advanced Feature enabled. uShip requires that ShipperHQ sends the dimensions of the products being shipped to retrieve real-time shipping rates.
Registering for a uShip Account
If you don’t yet have an account with uShip, sign up for a uShip In-Home Delivery account today. To connect your new account to ShipperHQ all you’ll need are your username and password for uShip.
Setting Up Your Products
If you sell a mixture of furniture and non-furniture items, it’s important to ensure that a uShip rate is retrieved only when customers are purchasing furniture. This can be accomplished using Shipping Groups.
Creating the Carrier
Steps To Add This Carrier
- Go to the Carriers page in the ShipperHQ dashboard
- Click + New to add a new carrier
- Select Live Rate Carrier
- Search for and select uShip
- Name this carrier (this name will be the name your customers see in the Checkout.)
- Success! Your uShip carrier has now been added to your list of carriers in ShipperHQ.
- You may now proceed to Enter Credentials & Validate, or you can skip this step and choose to validate your carrier at another time. If you choose to skip validation you can begin to configure your carrier’s settings right away.
Steps to Validate This Carrier
In order for your live rate carrier to access your live rates, you will need to enter your carrier account credentials for uShip and have them validated.
Validation simply means that ShipperHQ was able to access the shipping account related to the credentials that you entered and retrieve rates.
If you choose to skip validation after adding your new carrier you will be reminded to add your credentials later.
To Validate your uShip carrier:
- Select Enter Credentials & Validate
- Select an Origin, your uShip username and password and click Validate
Note: Successful installation depends on the accurate entry of the account information required. If you do not have the correct information you will not be able to validate your carrier and receive live rates.
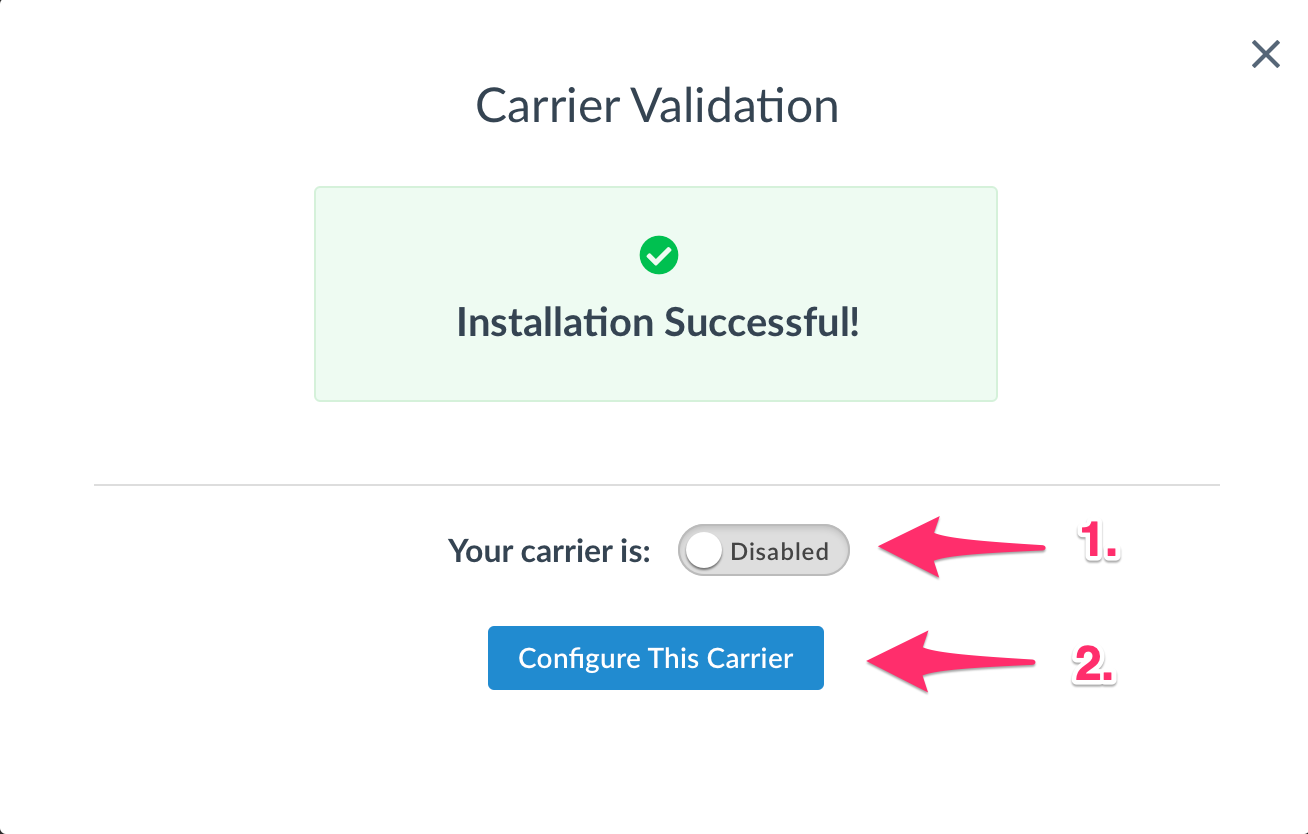
- If validation is successful, you will be presented with:
- The option to enable your carrier right away. (Enabling your carrier at this time will turn its rates on immediately even before you have made any configuration adjustments to it.)
- Configure This Carrier. Continuing with this button will take you to the carrier’s configuration page. You can also enable the carrier from this page once you have saved your settings.
- If validation fails, the credentials you have already entered will still be saved so they will populate the form when you return. You can:
- Choose to try validation again and double-check that the information you entered is correct.
- Skip validation for now and complete it later. You will be reminded to complete validation later to get rates.
- Contact us if you are struggling to validate your carrier and you believe the credentials you are using are correct.
Creating uShip Listings
When a customer completes checkout on your site for an item eligible for uShip In-Home Delivery, the next step is to create a uShip Listing. While you can always create a listing yourself at uShip.com, you can optionally choose to have ShipperHQ automatically create listings for you or create them yourself via your ecommerce platform. See the steps below for more information.
Once a listing has been created, you can log into your uShip account and see the automatically created listings. From here, you can manage them further from within the uShip dashboard. Contact uShip directly if you have any questions about how your listing, how to edit or update certain details, or the uShip shipping process in general.
Automatic Listing Creation
With this option enabled, ShipperHQ will automatically create a listing on uShip if a customer chooses uShip In-Home Delivery at checkout. Once the customer finishes checkout and an order is created, the ShipperHQ extension will use the product and order details to immediately create the listing.
If your customer does not select uShip at checkout but you still wish to create a uShip Listing for an order, you can do this using the “Create uShip Listing” button under Shipping Details on the Order. For example, if you offer Free Freight to some customers and don’t specify uShip as the service, you can still create a uShip listing. See Manual Listing Creation below for more details.
Enabling Automatic Listing
- Edit your uShip carrier in ShipperHQ and select the Listing tab
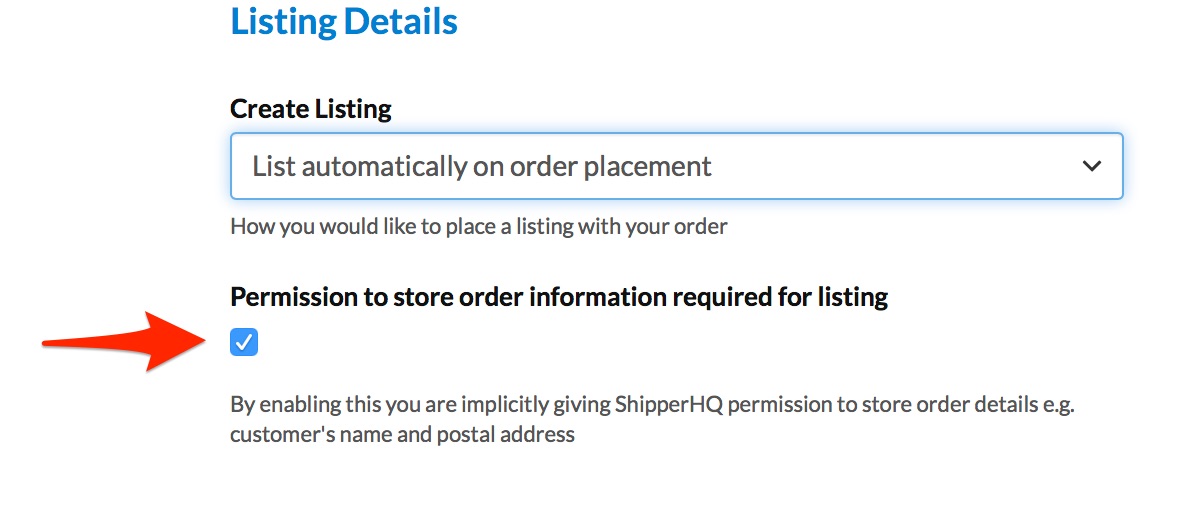
- To enable automatic listing, change the Create Listing setting to “List automatically on order placement”

- Save the carrier
- Select the checkbox to confirm your permission to store order data, this is a requirement to use listing functionality.
- If you are on Magento, synchronize with ShipperHQ to enable the automatic listing creation.
For Magento users, ff the listing successfully created, you will see “uShip Listing Created” followed by the uShip Listing ID under Shipping Details on the Order. Clicking on the Listing ID will take you directly to that listing on uShip.
If unsuccessful, you will see “uShip listing failed” to indicate the listing was not successful. See Troubleshooting Listing Creation for more details on why this might happen and how to correct issues around listing. Once you’ve corrected any issues that may have caused listing to fail, you can manually create the listing using the “Create uShip Listing” button on the Order under Shipping Details allowing you to Manually Create a Listing. See Manual Listing Creation below for more details.
Manual Listing Creation (Magento only)
With this option enabled, ShipperHQ will not automatically create uShip listings but you will have the option to create a listing for an Order using the “Create uShip Listing” button under Shipping Details.
Enabling Manual Listing
- Edit your uShip carrier in ShipperHQ and select the Listing tab
- To enable manual listing, change the Create Listing setting to “Create listings manually”

- Select the checkbox to confirm your permission to store order data, this is a requirement to use listing functionality.
- Save the carrier
- Within Magento, synchronize with ShipperHQ to enable listing creation.
Creating a Listing
- On an Order which you wish to list on uShip, click the “Create uShip Listing” button under Shipping Details on the Order
- You’ll be given the option to adjust what products you wish to list by unchecking or changing the quantity of products in the order
- When you continue, you’ll see the amount charged for shipping to the customer as well as a real-time rate from uShip for the products you’ve chosen to list
- After confirming, you’ll be shown a success message and the uShip Listing ID. Clicking on the Listing ID will take you directly to the listing on uShip
Once the listing has been created, you’ll now have the uShip Listing ID under Shipping Details on the Order. Only one listing can be created via this process per order. If you only list part of an order initially and wish to list additional items subsequently, you can create a listing directly at uShip.com.
If listing failed, see Troubleshooting Listing Creation for more details on why this might happen and how to correct issues around listing. Once you’ve corrected any issues that may have caused listing to fail, you can attempt to create the listing again following the same steps described above.
Troubleshooting Listing Creation
The most common reason for listing creation failing is that your products do not have dimensions set on them in your product catalog. Note that you may have received a uShip rate if you have a default box set up on your uShip carrier in ShipperHQ even if your products do not have dimensions set on them in your catalog. However, in order to successfully create a listing you will need to ensure that all products being listed have dimensions set on them.
If the ShipperHQ logger is enabled, details of the listing call will be logged out there. This will include any errors that may be returned if listing creation is not successful.