Overview
The recently released shipping incentives feature for Shopify Plus merchants using ShipperHQ are aimed at increasing conversions to drive higher order values and to incentivize customers to complete their orders within a designated amount of time.
Shipping Incentives include the following capabilities:
- Shipping Deadline: A checkout banner that displays the time a shopper needs to order by to receive their purchase by the estimated delivery date.
- Free Shipping Minimum: A checkout banner that displays the amount needed to qualify for free shipping.
This setup guide can be used to quickly enable and configure either or both of the ShipperHQ Shipping Incentives features on your Shopify Plus store.
Shipping Deadline
The Shipping Deadline feature is Intended to reward prompt checkout by customers. This feature displays a timer to indicate that orders completed by the deadline will receive free, next day shipping.
Installed as a checkout block in Shopify Plus, this feature can be added and tailored with specific messaging for checkout.
Requirements
There are two requirements for using the ShipperHQ Shipping Deadline checkout block.
These include:
- Shopify Plus Plan
- ShipperHQ Advanced or Enterprise Plan. Please contact us for more information on upgrading your ShipperHQ plan.
Setup Instructions for Shipping Deadline Feature
When enabling the Shipping Deadline for your Shopify Plus store, there are two steps to be taken in the ShipperHQ dashboard:
ShipperHQ Setup
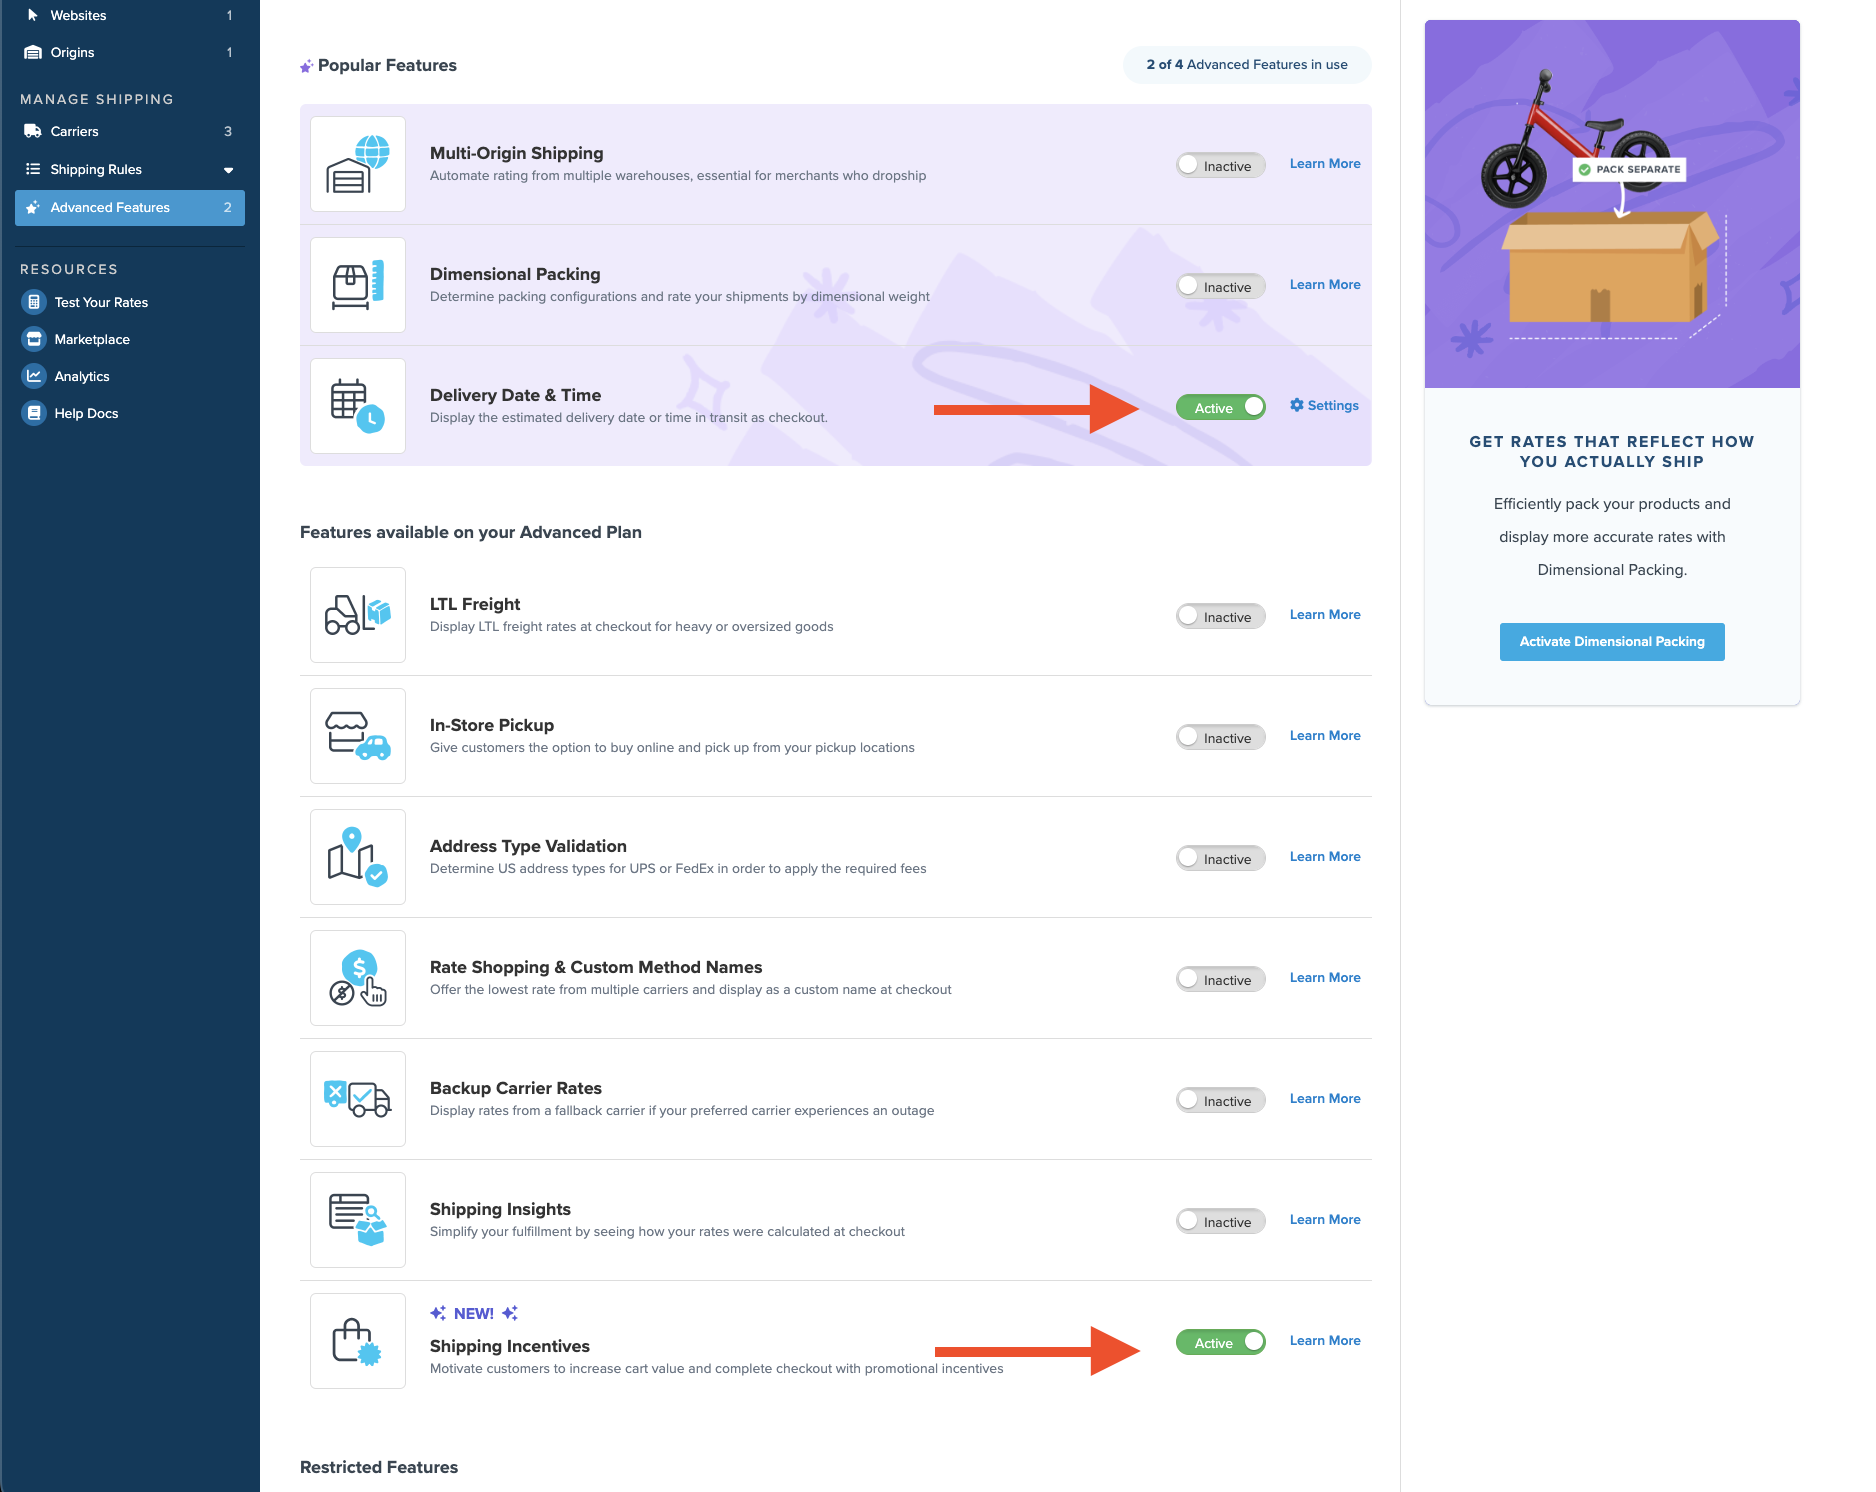
- Enable ShipperHQ’s Delivery Date & Time Advanced Feature.
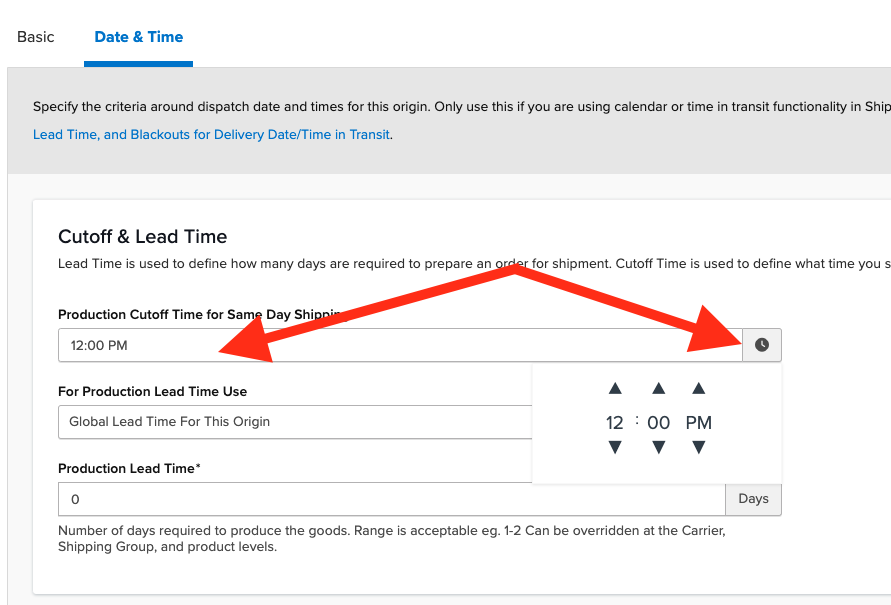
- A cut-off time for same day dispatch set on your origin(s).
- Enable the Shipping Incentives Advanced Feature.
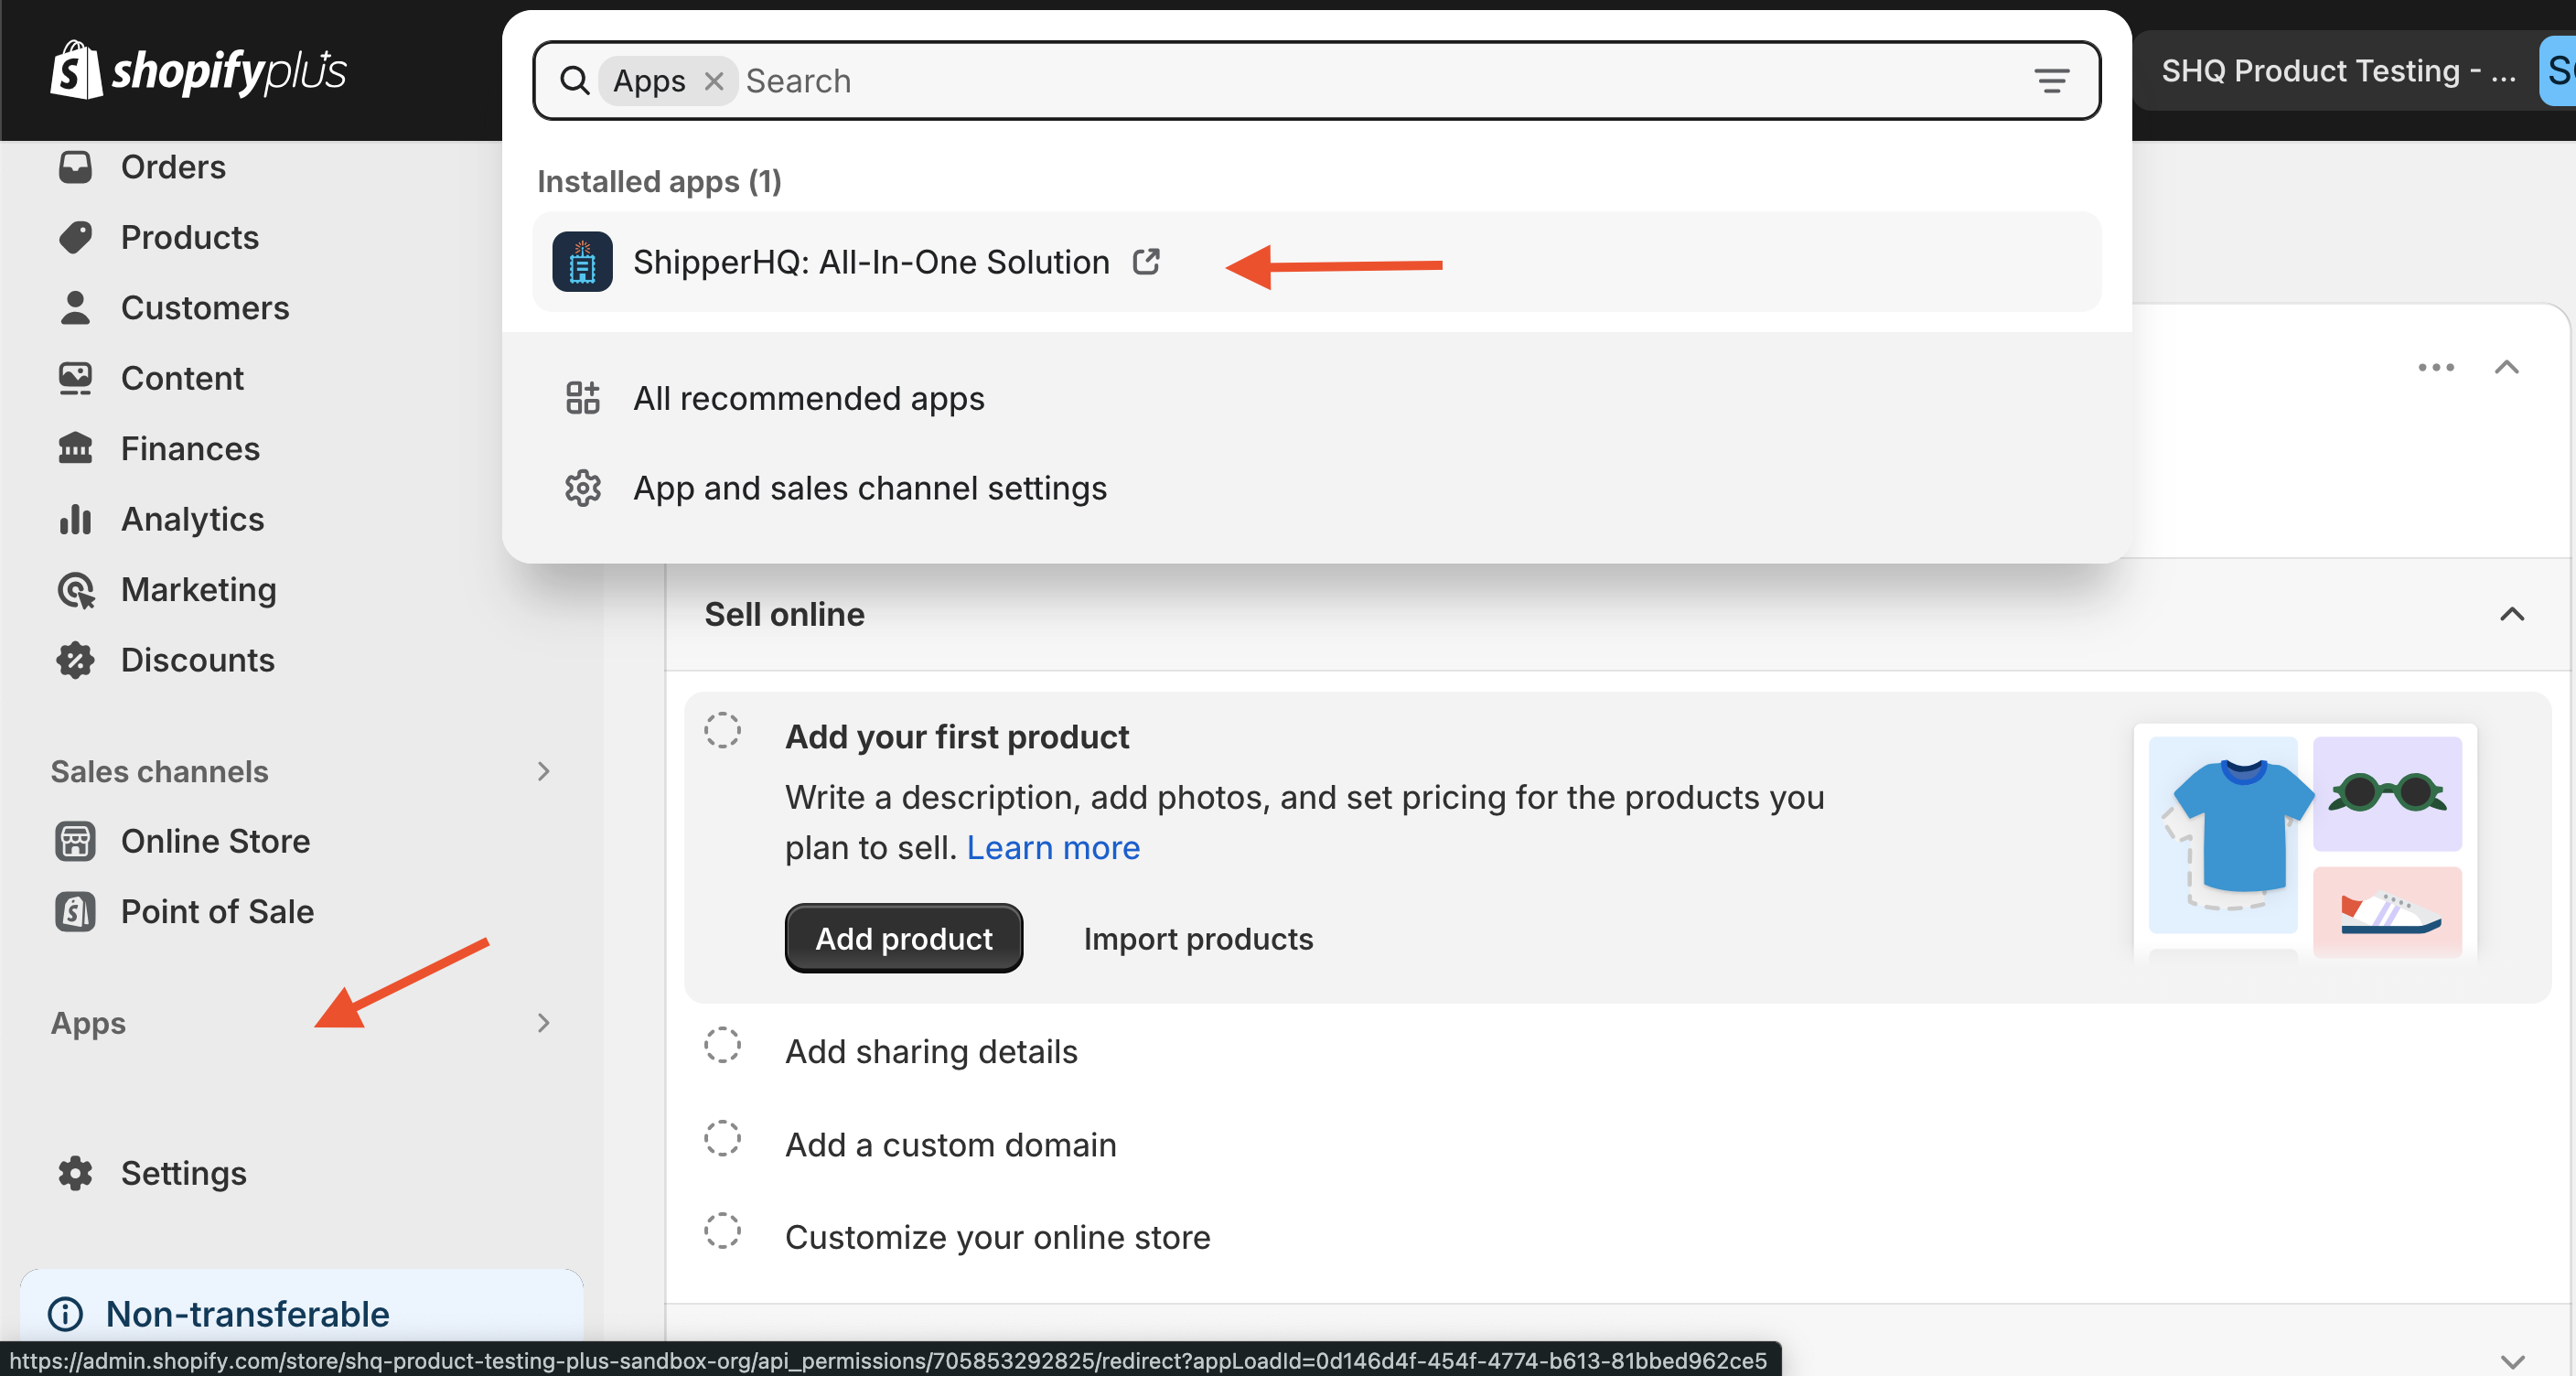
To enable these features in ShipperHQ, you’ll login to your Shopify store and navigate to Apps > ShipperHQ.
Once inside your ShipperHQ account, you will navigate to the Advanced Features page using the left navigation menu. From here, simply toggle each feature to enabled if they are not toggled on yet.
Date and Time Settings
To enable a cut-off time for same day dispatch, you can apply a simple time to each origin in your ShipperHQ account under the Date and Time tab on the origin. This is handy for merchants who use a unified cut-off time across all carriers.
Click the icon to scroll and set the applicable cutoff time or manually type the time in to the open text field.
Enabling Shipping Deadline in Shopify Plus
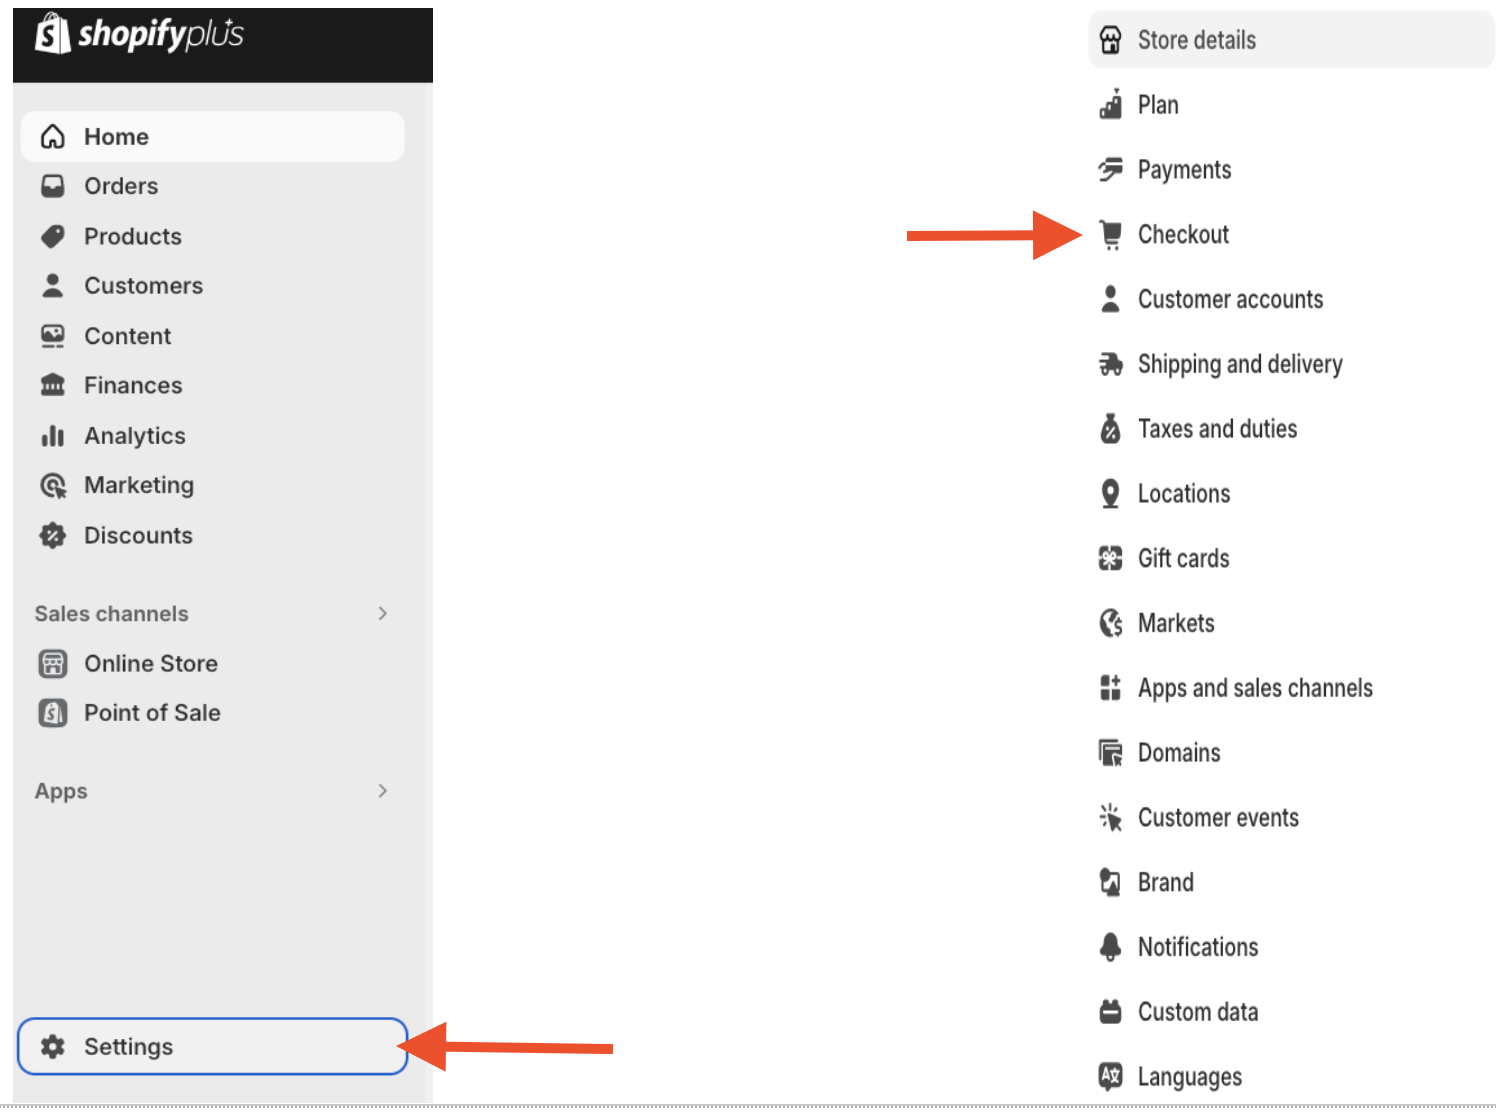
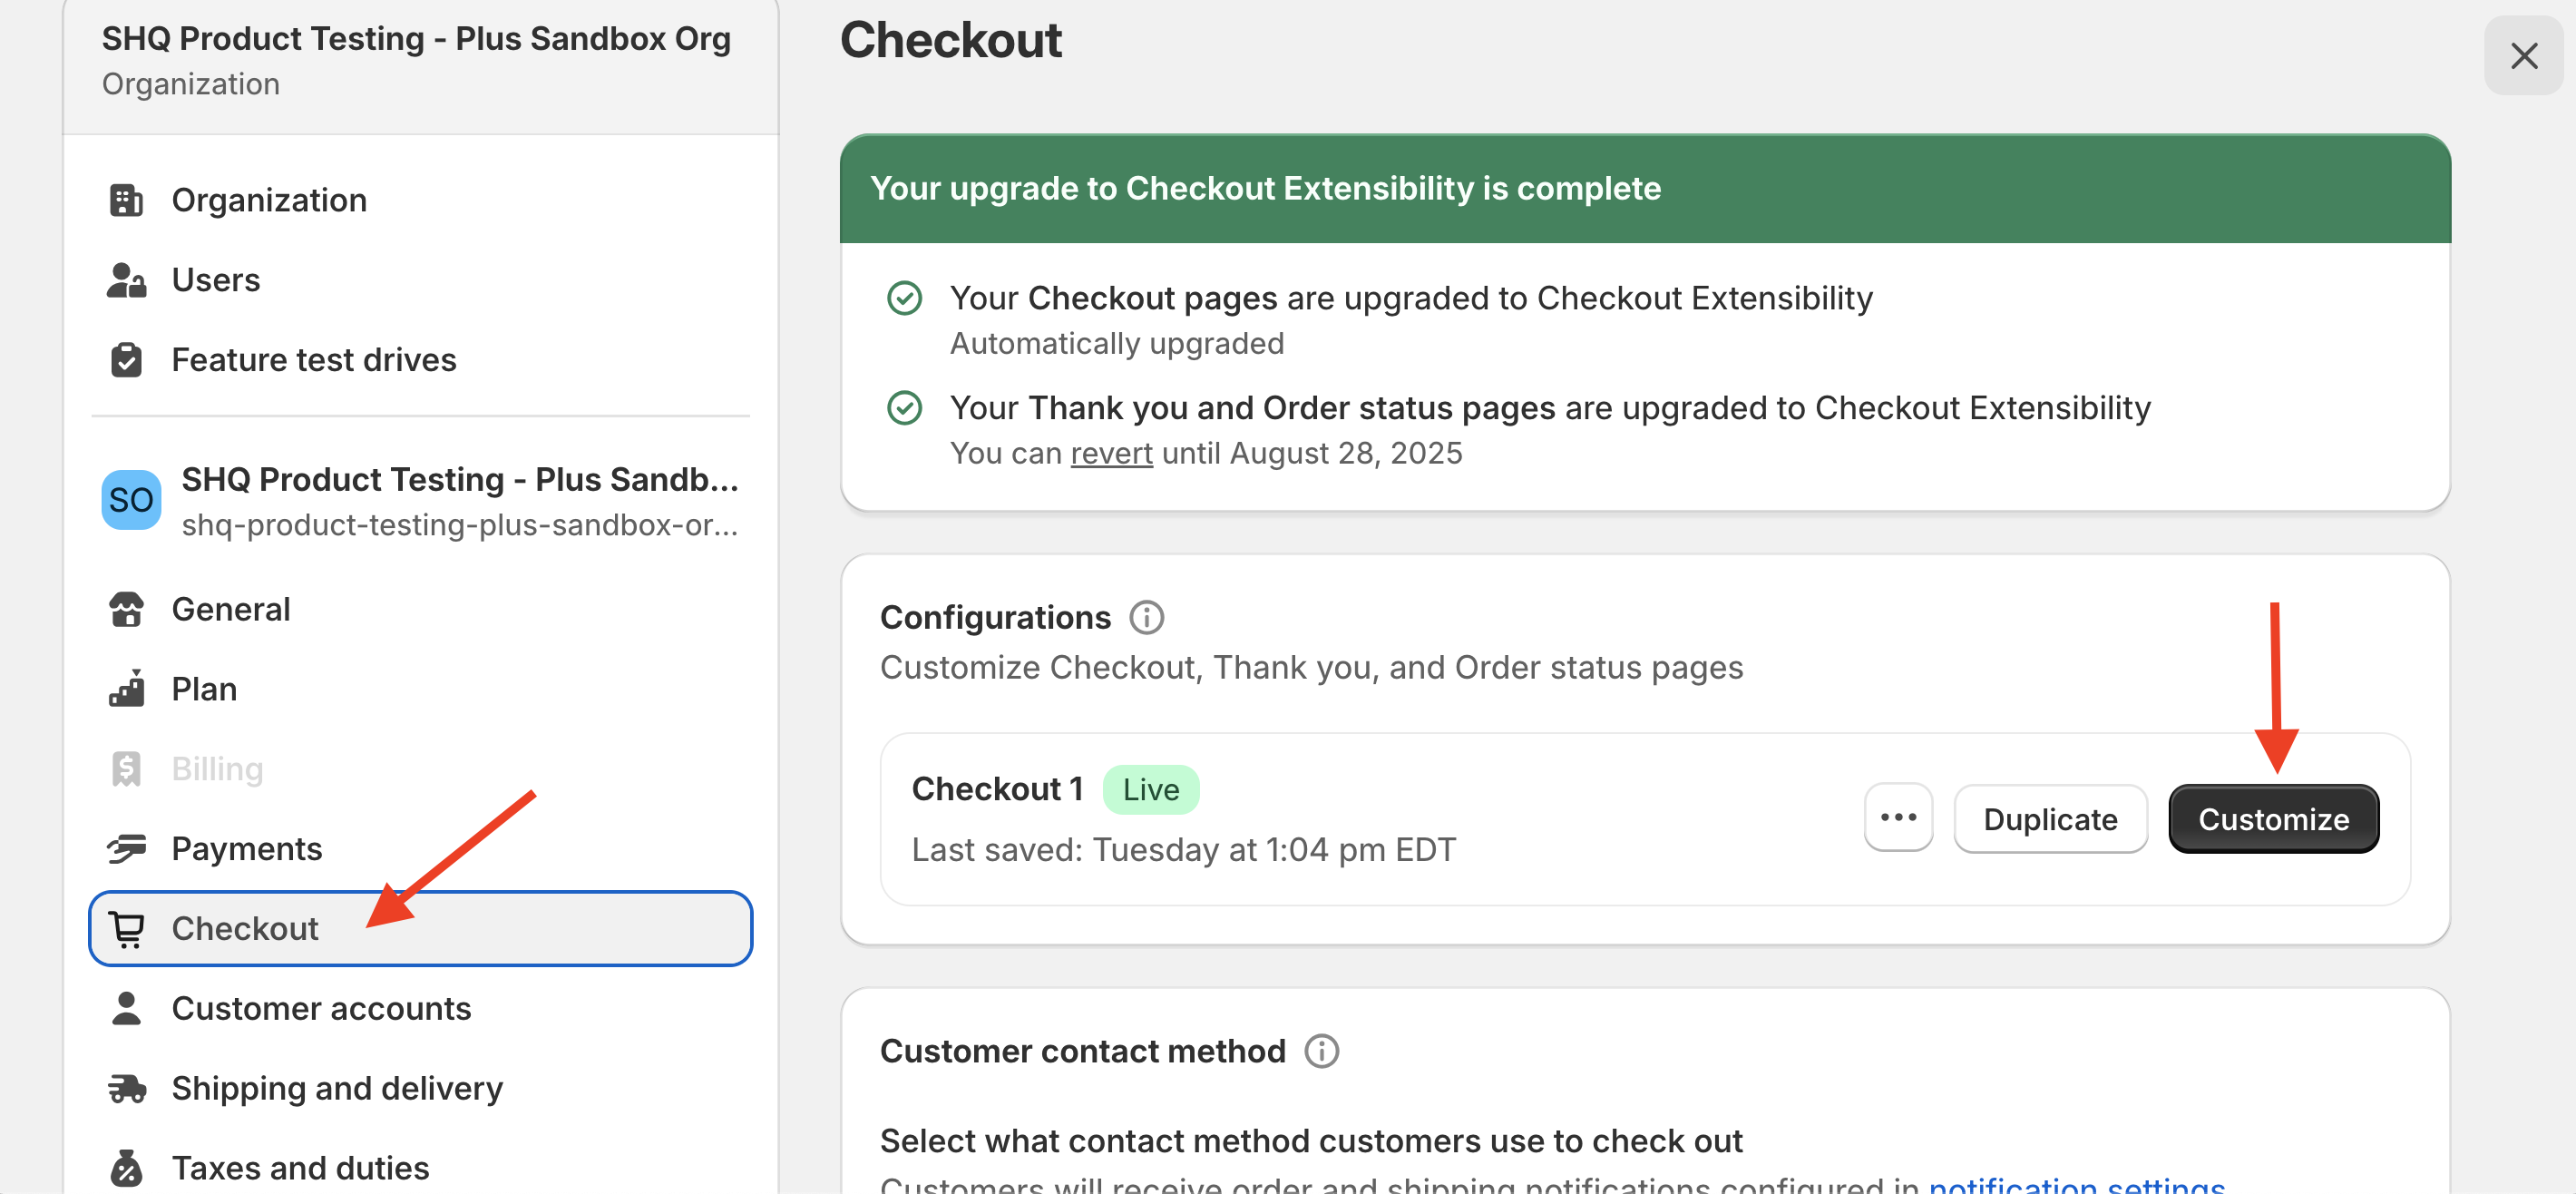
1. From the Shopify Plus dashboard, navigate to Settings then Checkout.
2. To add the ShipperHQ Shipping Deadline app block, click “Customize” on the checkout page.
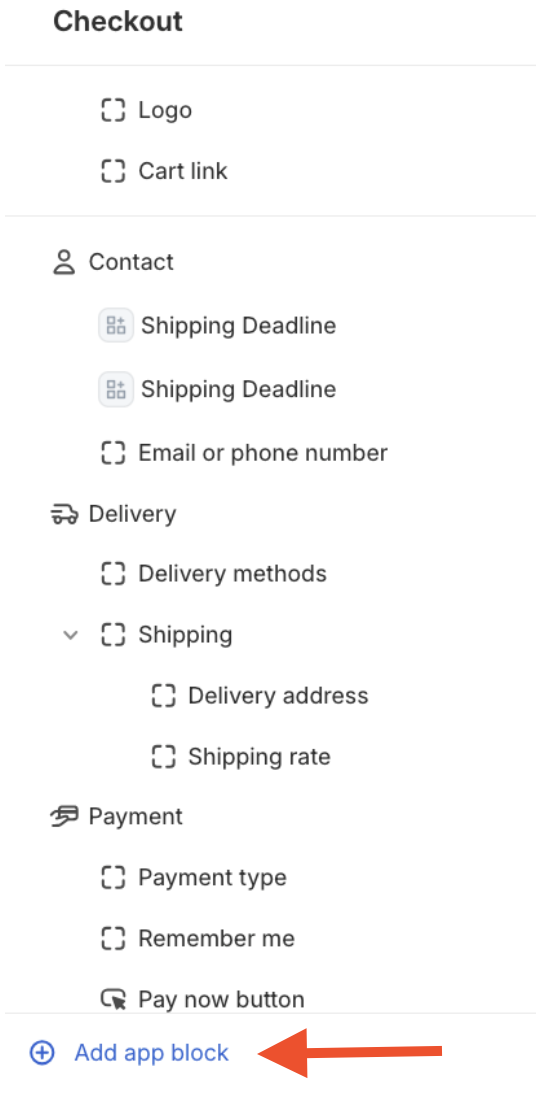
3. In the lower, left corner of the dashboard, select “Add app block” to view all available checkout blocks for ShipperHQ in Shopify Plus.
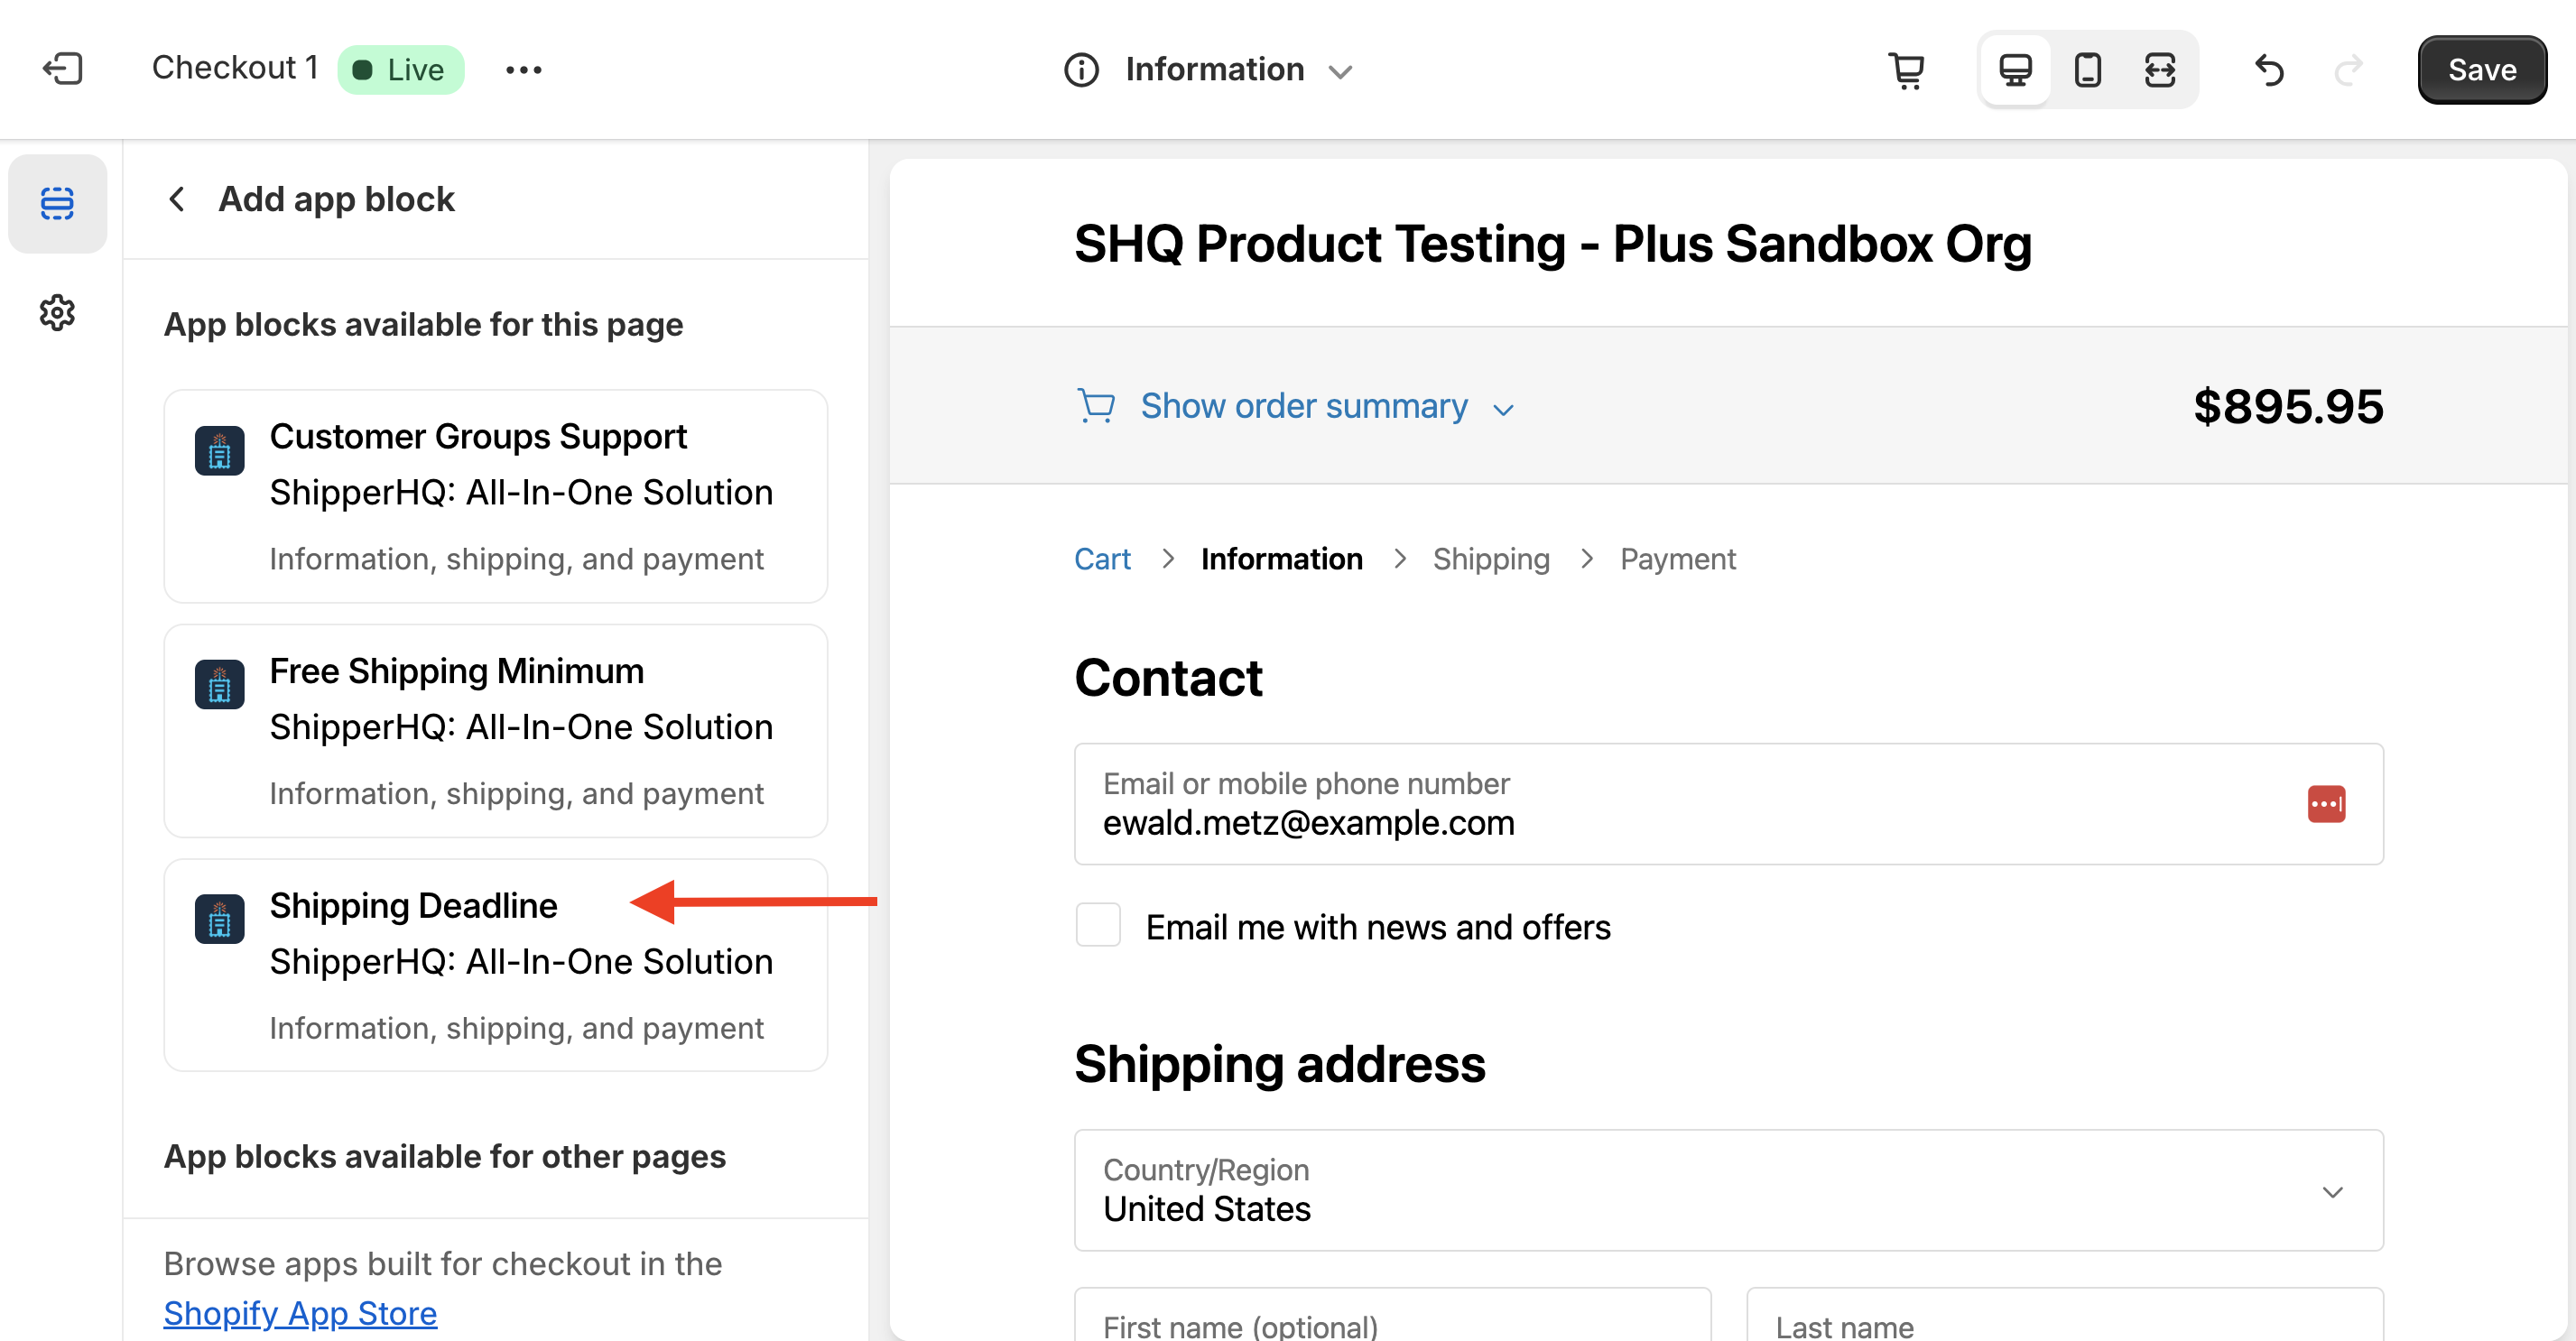
4. Once the available checkout Blocks are displayed on the left side of the screen, click to select “Shipping Deadline” and it will be added to the “App Blocks Available for this Page” section.
Custom Configuration Options
Once the Shipping Deadline checkout block has been added, there are several options to use in tailoring the feature to meet your requirements.
A text field is provided to be used for displaying a call to action at checkout. This text field is blank by default, however, a preview of the checkout block is available to see how the field will display at checkout.
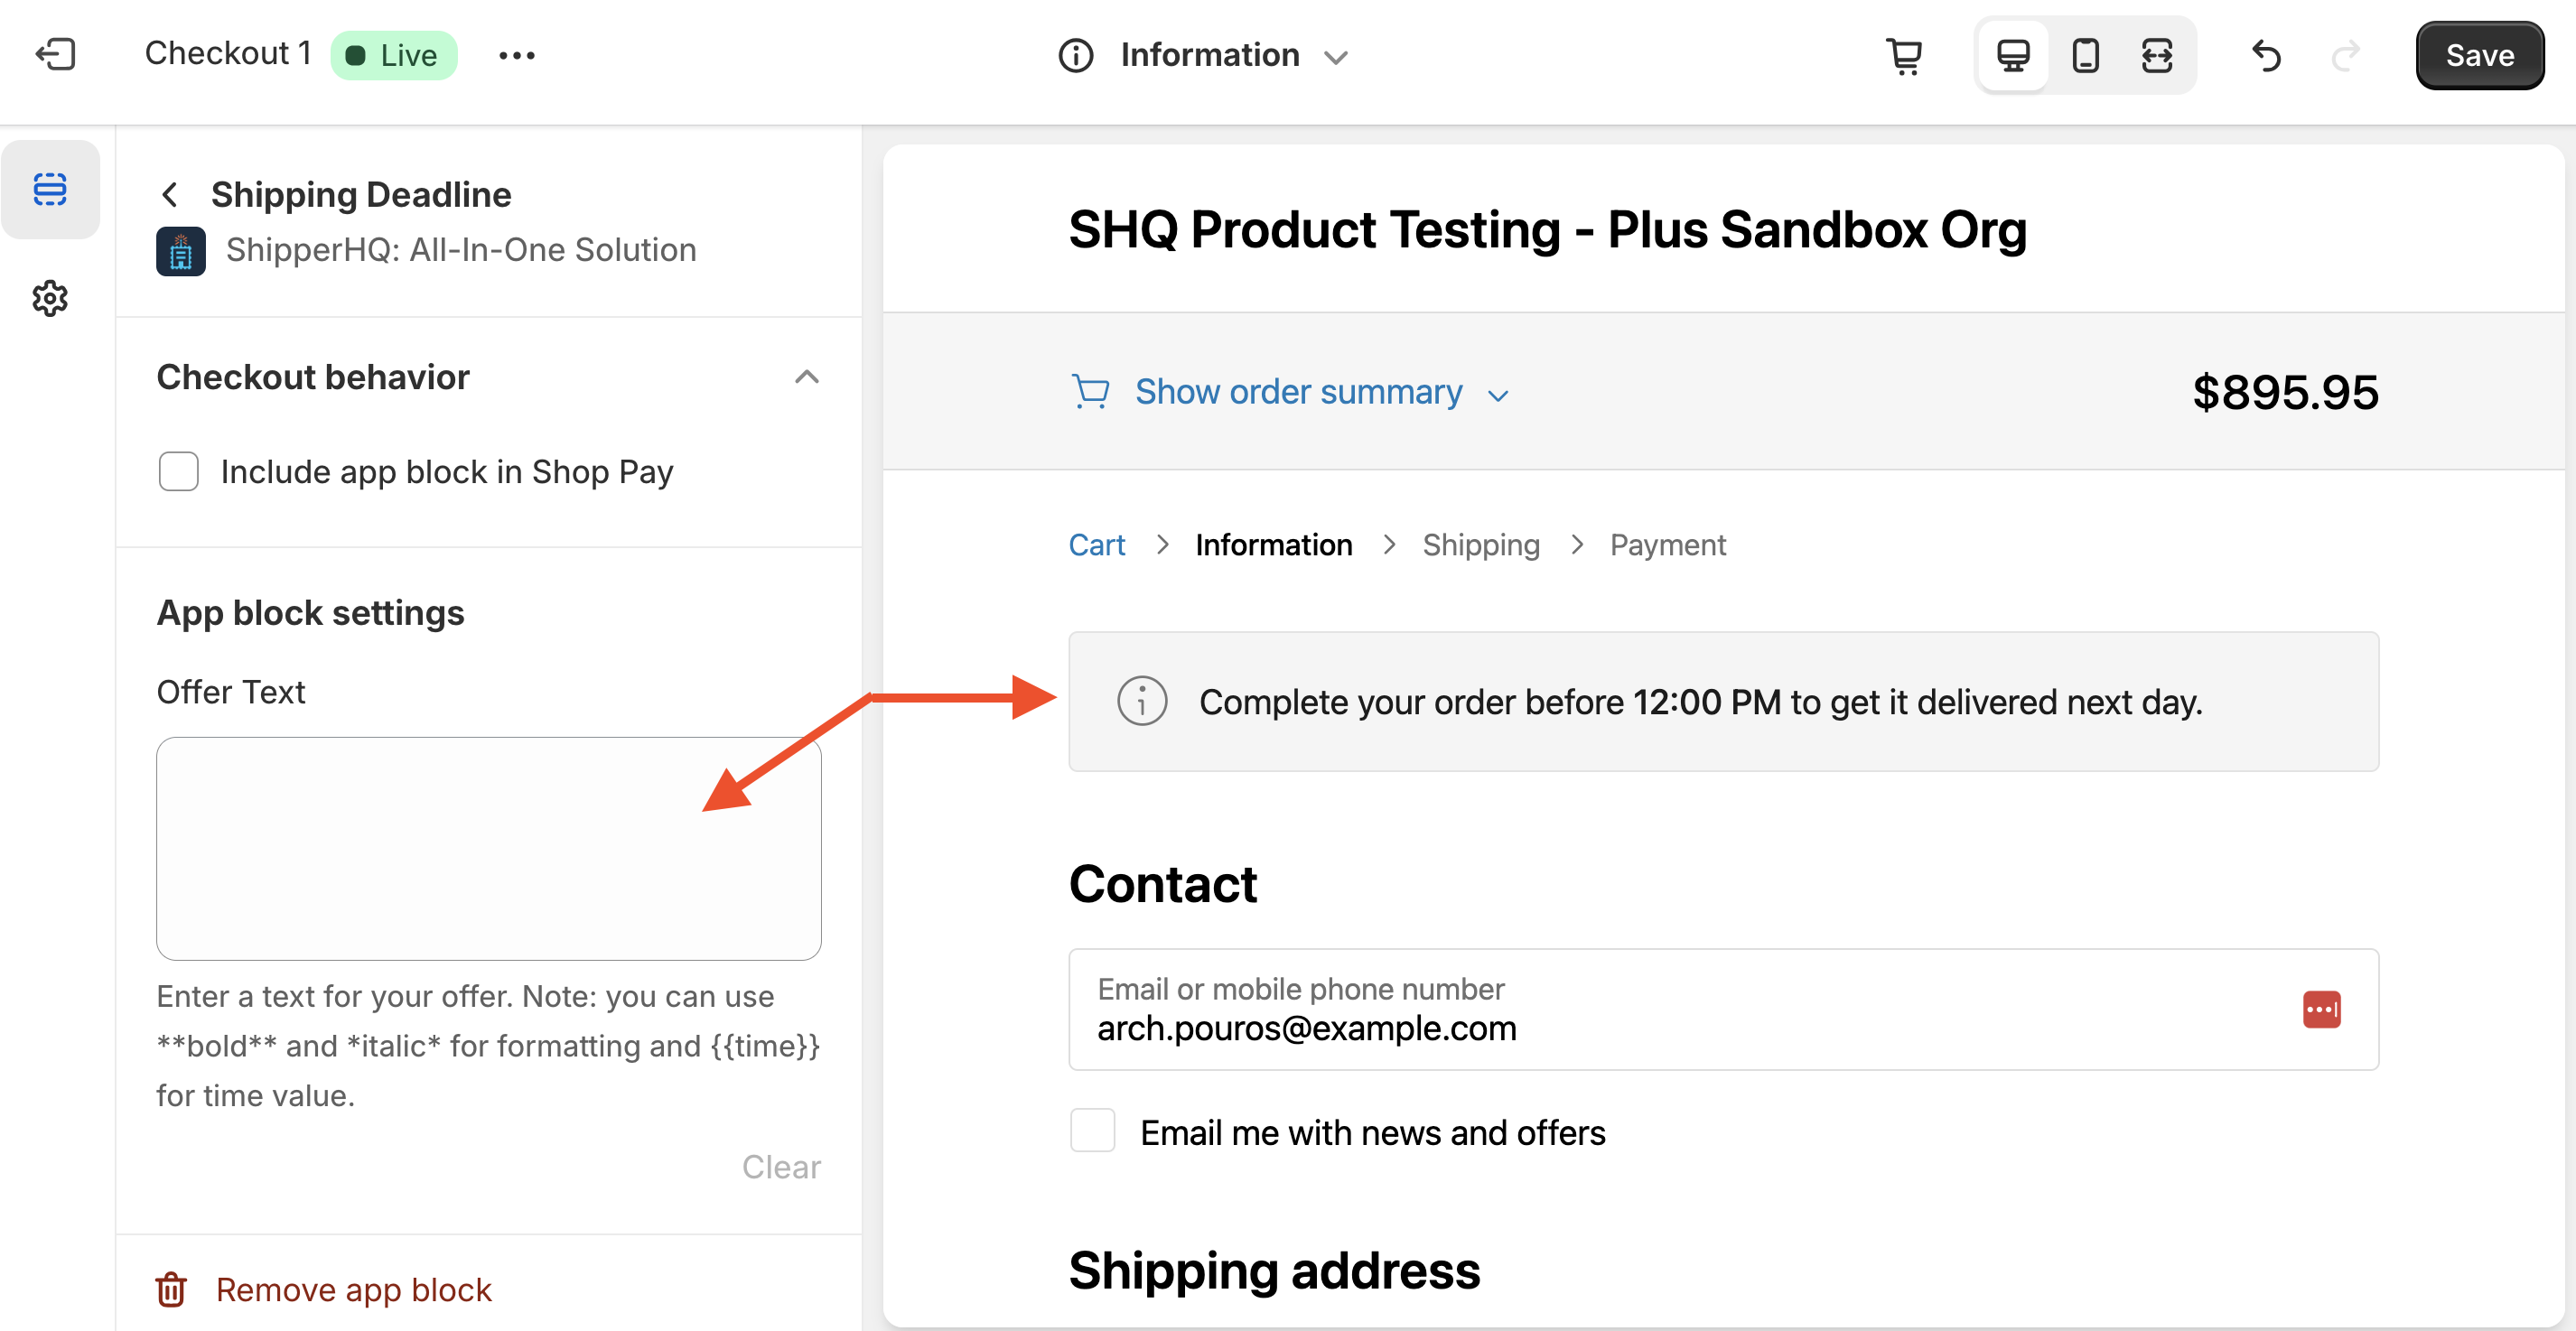
By adding text to the available field, you will see the check-out block updated with your new details.
You will also want to make sure your text includes the following, variable tag: {{time}}
For example, we might use the following text:
Next day delivery available if you order by {{time}}
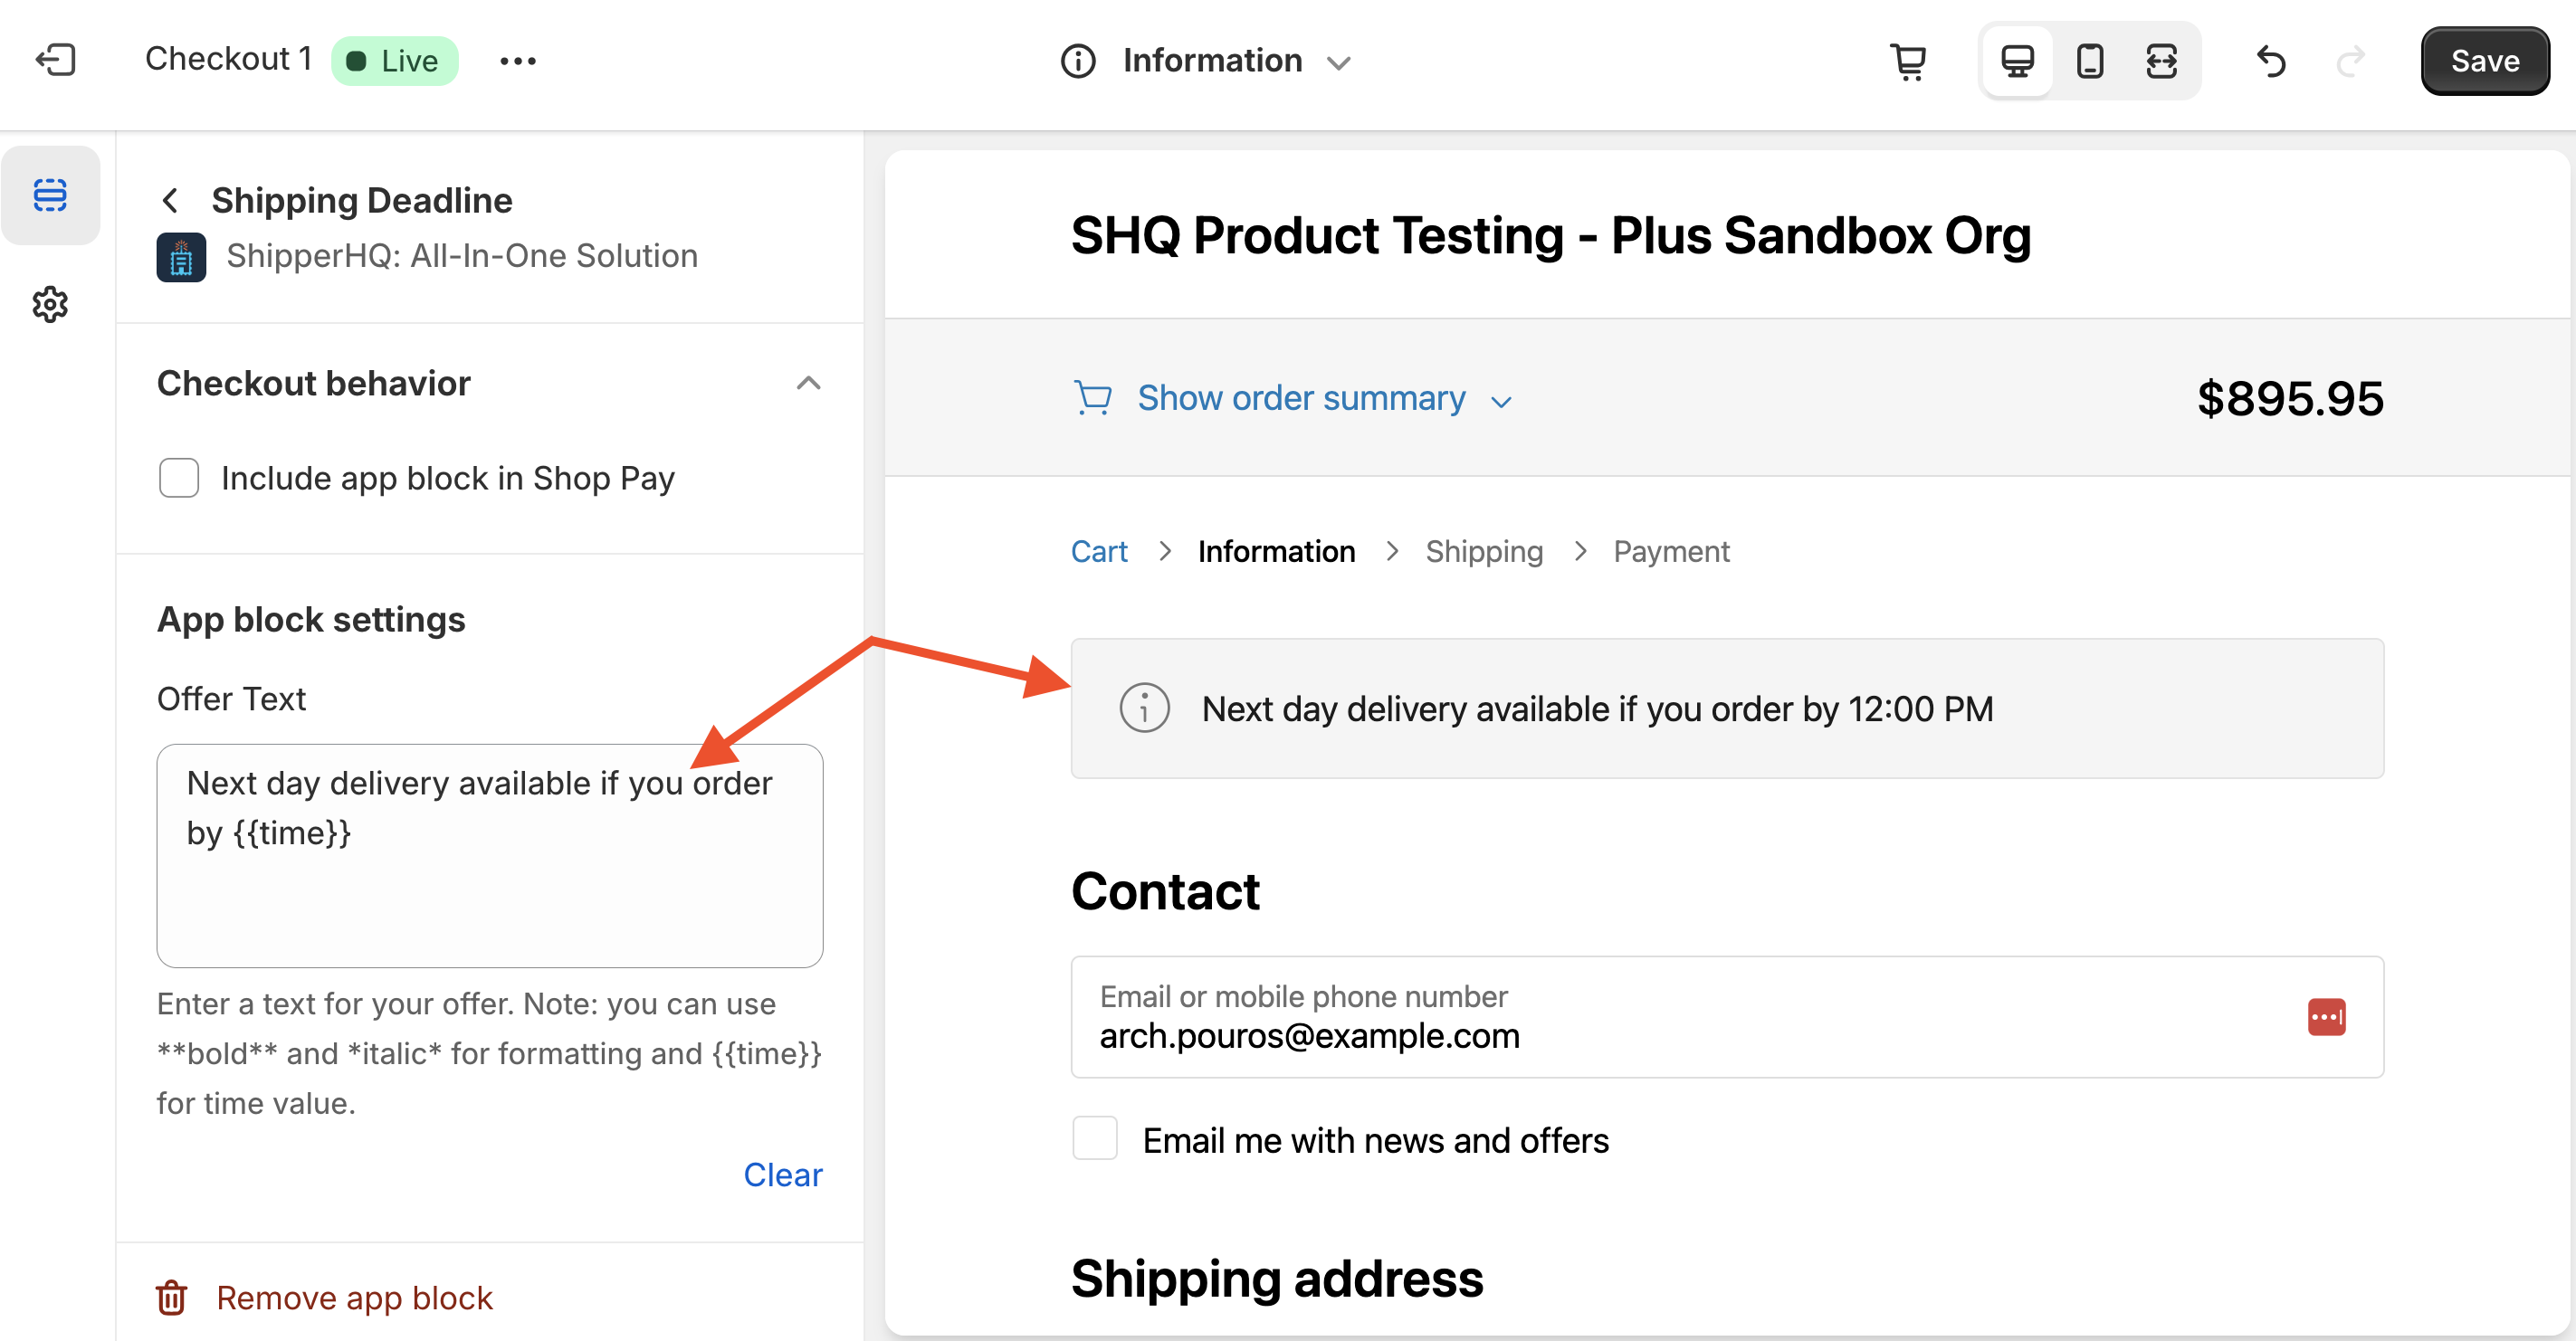
The variable tag, {{time}} will use the time set on your origin’s date and time settings for same day dispatch & will help to ensure this time always matches your ShipperHQ Origin settings, should the same day dispatch cut-off be changed in the future.
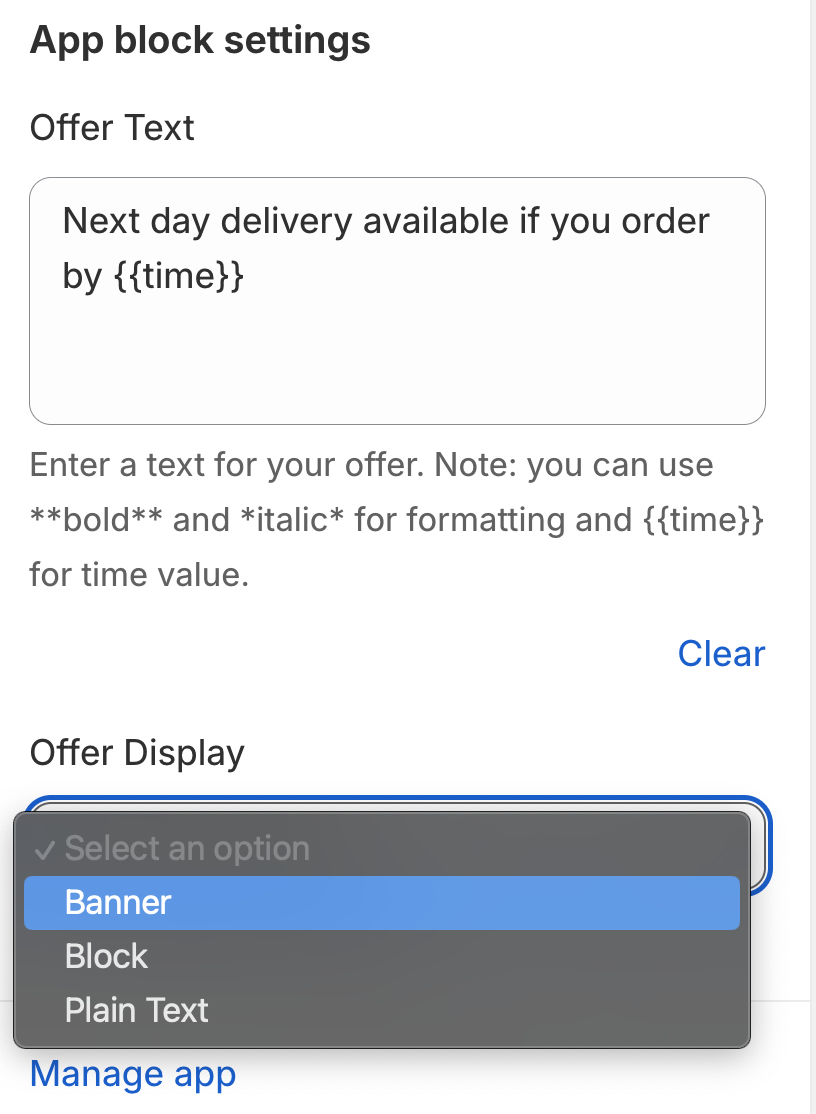
You can also choose the way in which the checkout block will be displayed. These options include Banner-style, as a block, or simply display as plain text.
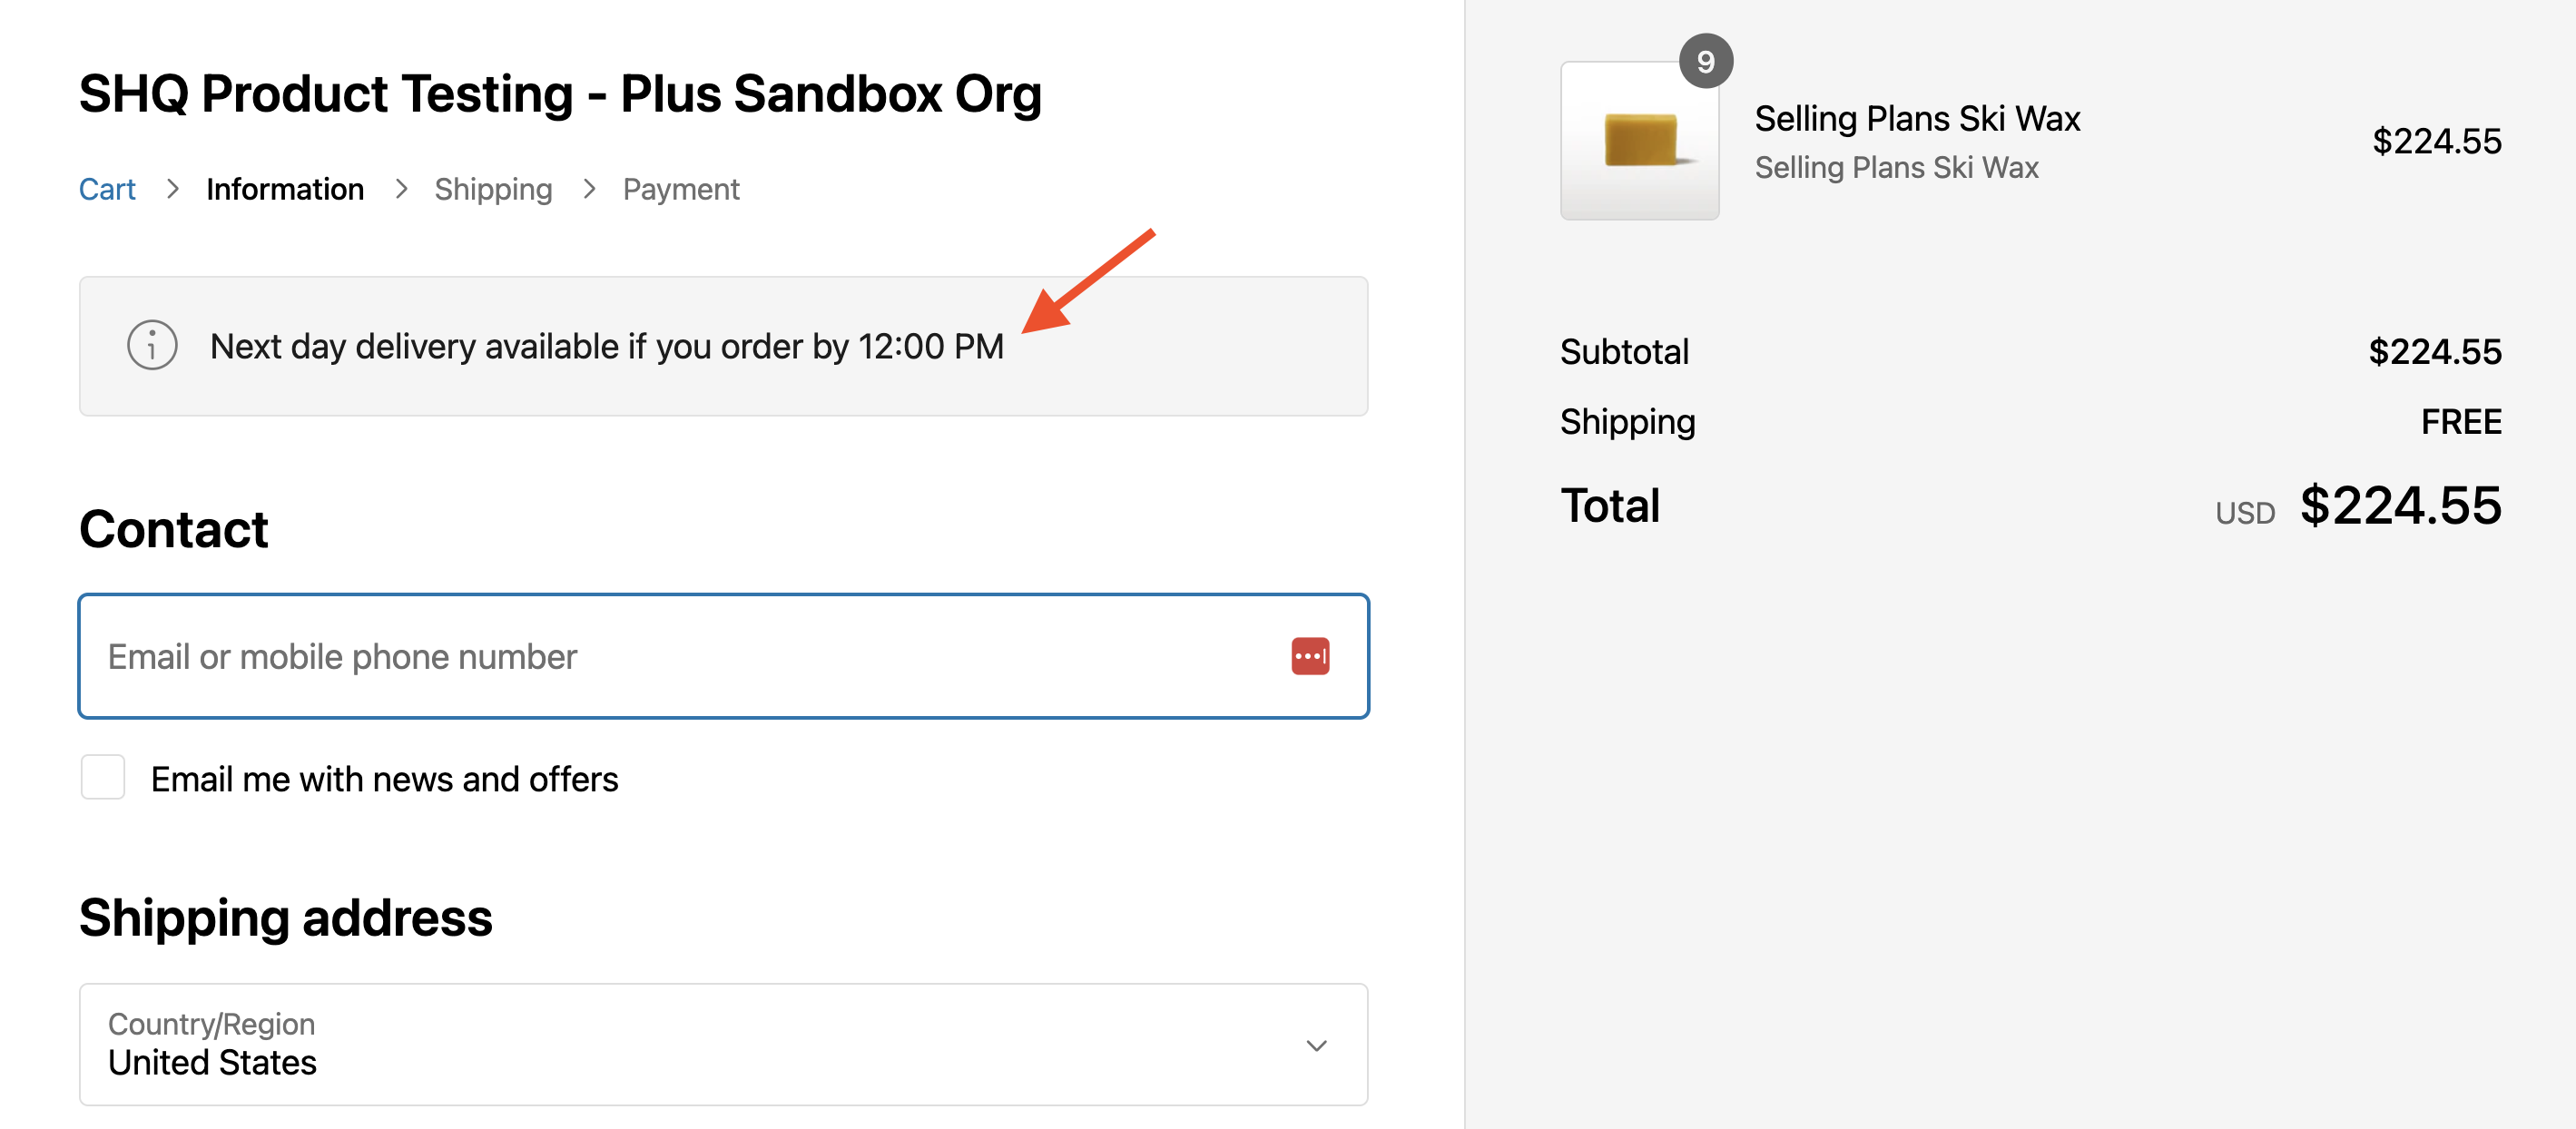
Once these settings have been applied, you can preview your site by adding products to the cart and continuing to checkout.
Special formatting Options
You can also apply special formatting in the promotional text to bring more focus to the incentives being offered.
A list of custom formatting options is provided below. These can be added to the text entered in the Offer Text field and displayed on the checkout page.
Supported Format Options
- Bold Text: Using the double asterix, (**) around your checkout block text or around specific areas of text, you can draw attention to the incentive. For example, using the following will BOLD all text in the block:
**Next Day Delivery available if you order by {{time}}**
- Italic Text: Similar to the approach above, using a single asterix (*) before and after any selected text can be used to italicize the text. For example, using the following will change the text to Italic for the text listed in the block:
*Next Day Delivery available if you order by {{time}}*
Another option is to combine both the Bold and Italics tags within the text to make the call to action even more appealing. For example:
**Next Day Delivery** available if you order by *{{time}}*
Free Shipping Minimum
Requirements
There are three requirements for using the ShipperHQ Free Shipping Minimum checkout block.
These include:
- ShipperHQ Advanced or Enterprise Plan
- Shopify Plus plan
- A Free Shipping Rule created in ShipperHQ based on order value.
ShipperHQ Setup
To enable the Free Shipping Minimum feature for your Shopify Plus store, there are two steps to be taken within the ShipperHQ dashboard.
- Enable the Shipping Incentives Advanced Feature.
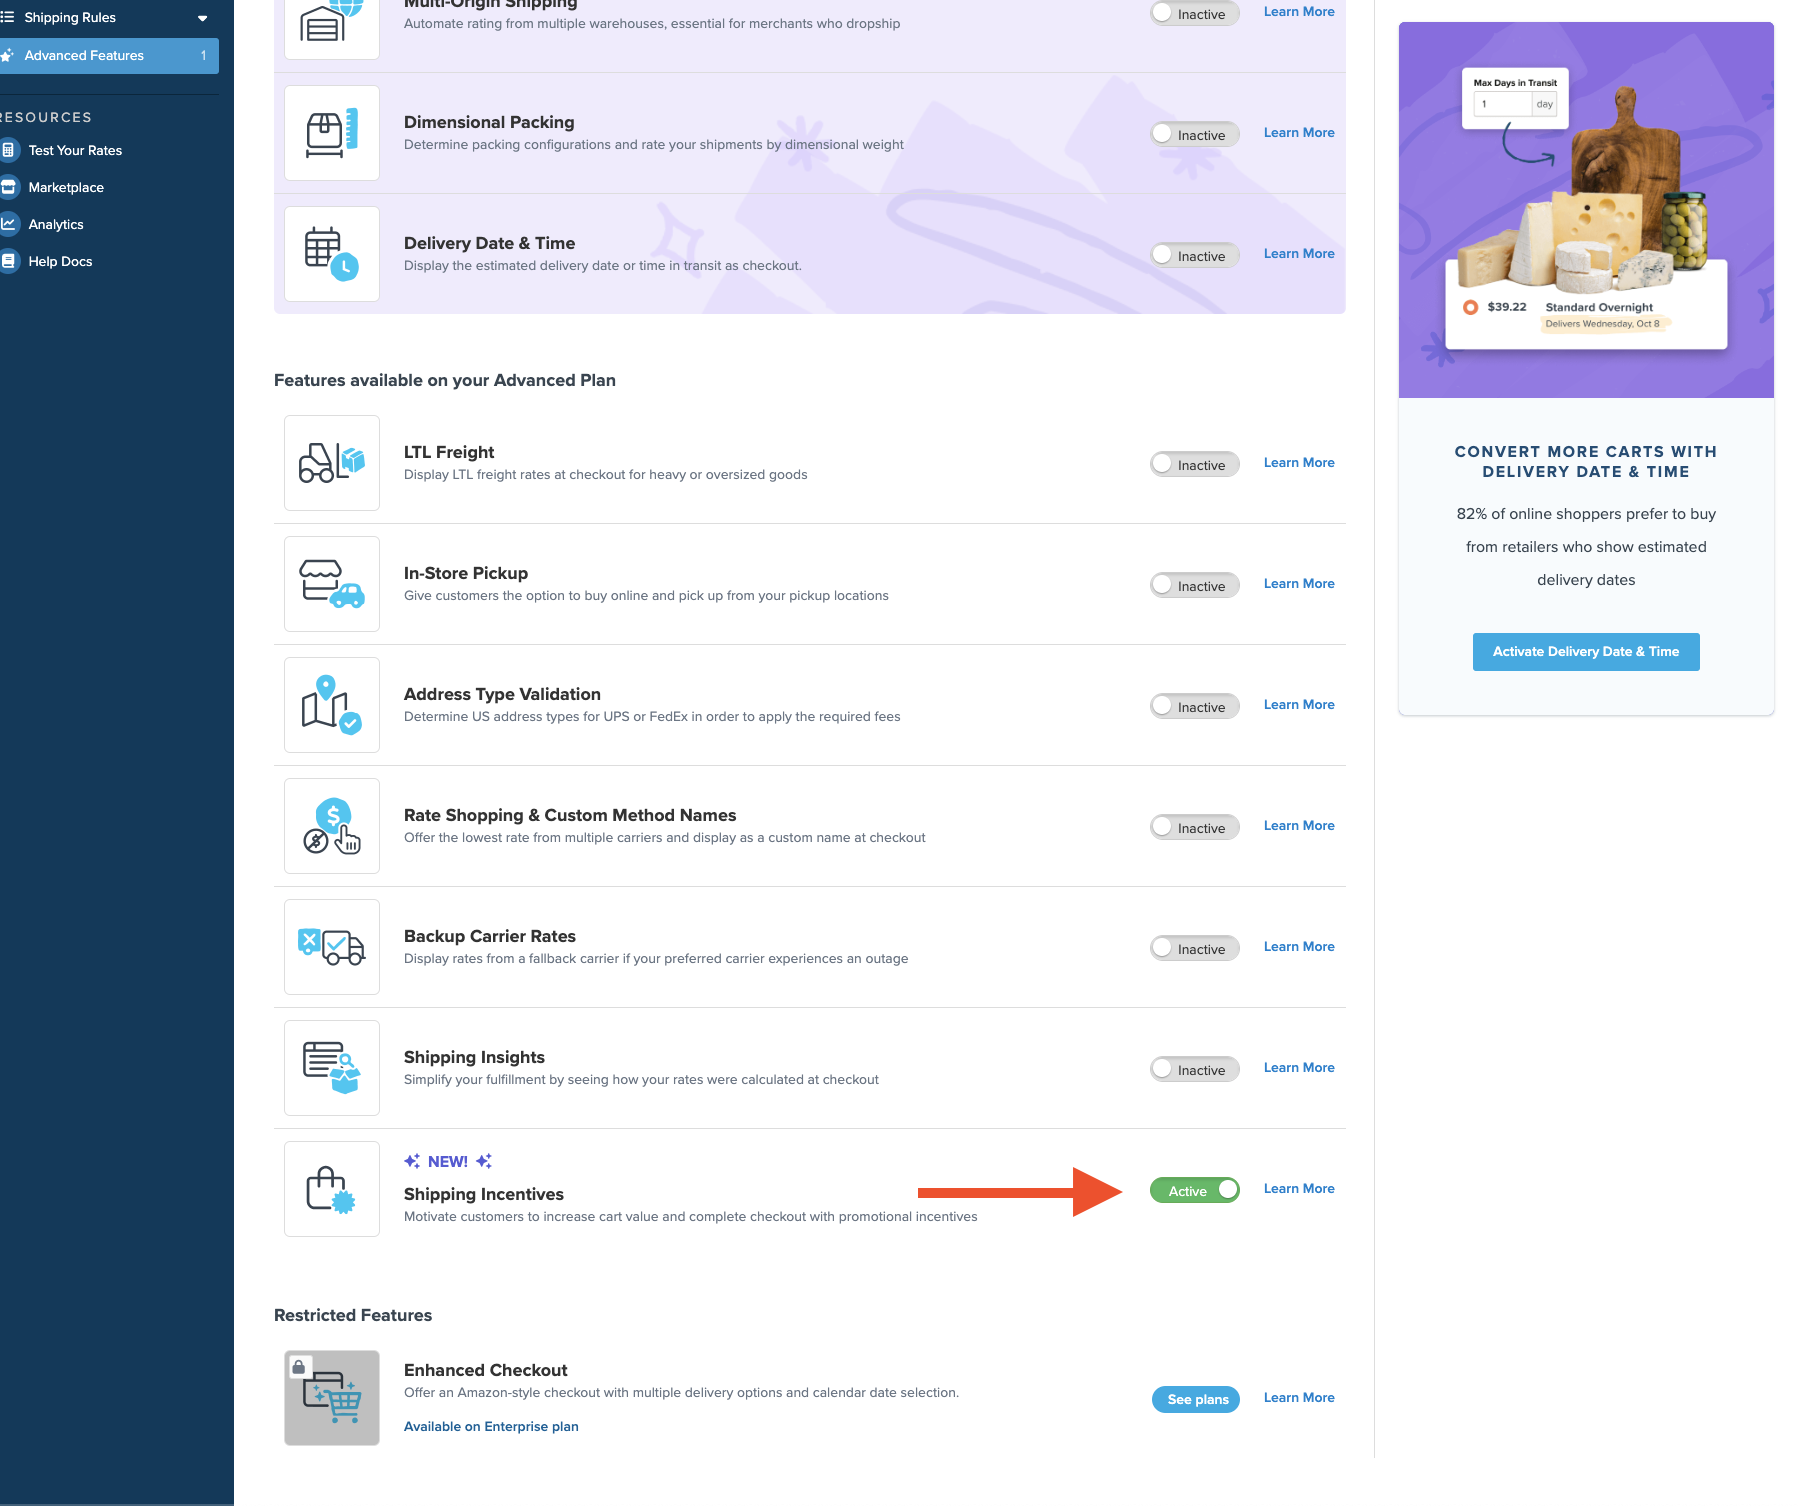
2. Once enabled, a Free Shipping Rule can be created in ShipperHQ using a filter to set the desired order value.
In the example below, we’ll use a simple Free Shipping rule with $100 as the threshold for the order value to qualify for Free Shipping.
Shopify Plus Setup
1. From the Shopify Plus dashboard, navigate to Settings then Checkout.

2. To add the ShipperHQ Free Shipping Minimum app block to your checkout, click “Customize” on the checkout page.

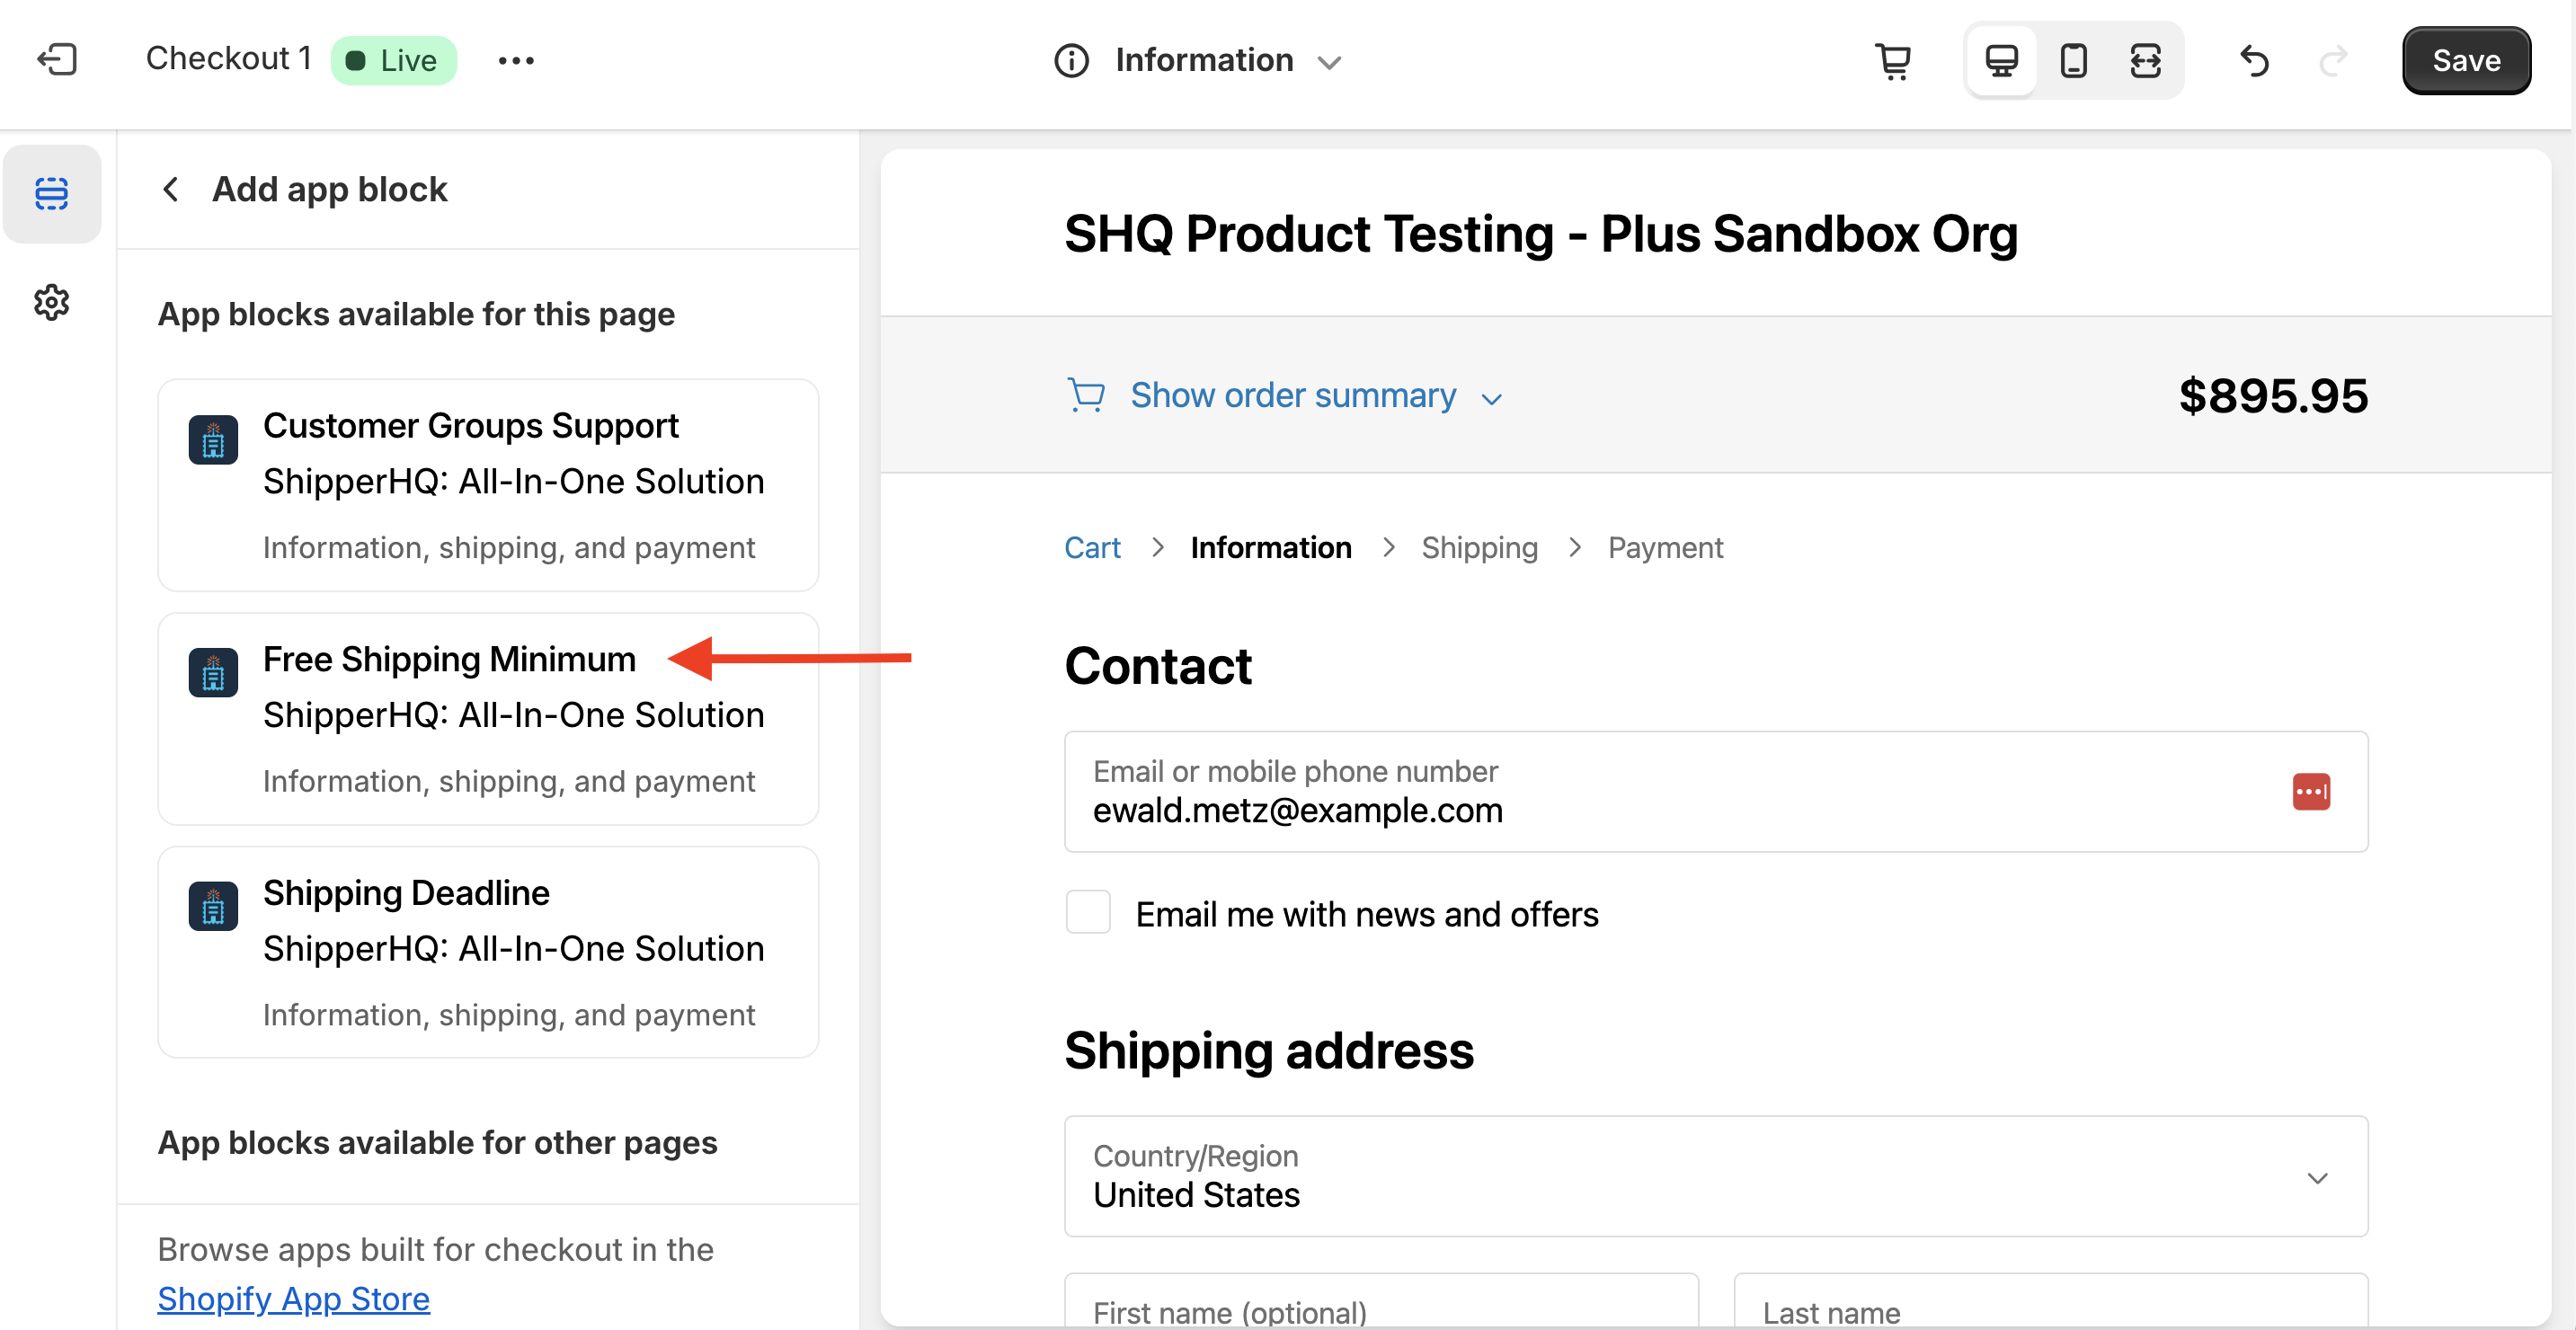
3. In the lower, left corner of the dashboard, select “Add app block” to view all available checkout blocks for ShipperHQ in Shopify Plus.

4. Once the available checkout Blocks are displayed on the left side of the screen, click to select “Free Shipping Minimum” and it will be added to the “App Blocks Available for this Page” section.
Custom Configuration Options
Once the Free Shipping Minimum checkout block has been added, there will be several areas to use in tailoring the feature to meet your requirements.
A text field is provided to be used for displaying a call to action at checkout. This text field is blank by default, however, a preview of the checkout block is available to see how the field will display at checkout.
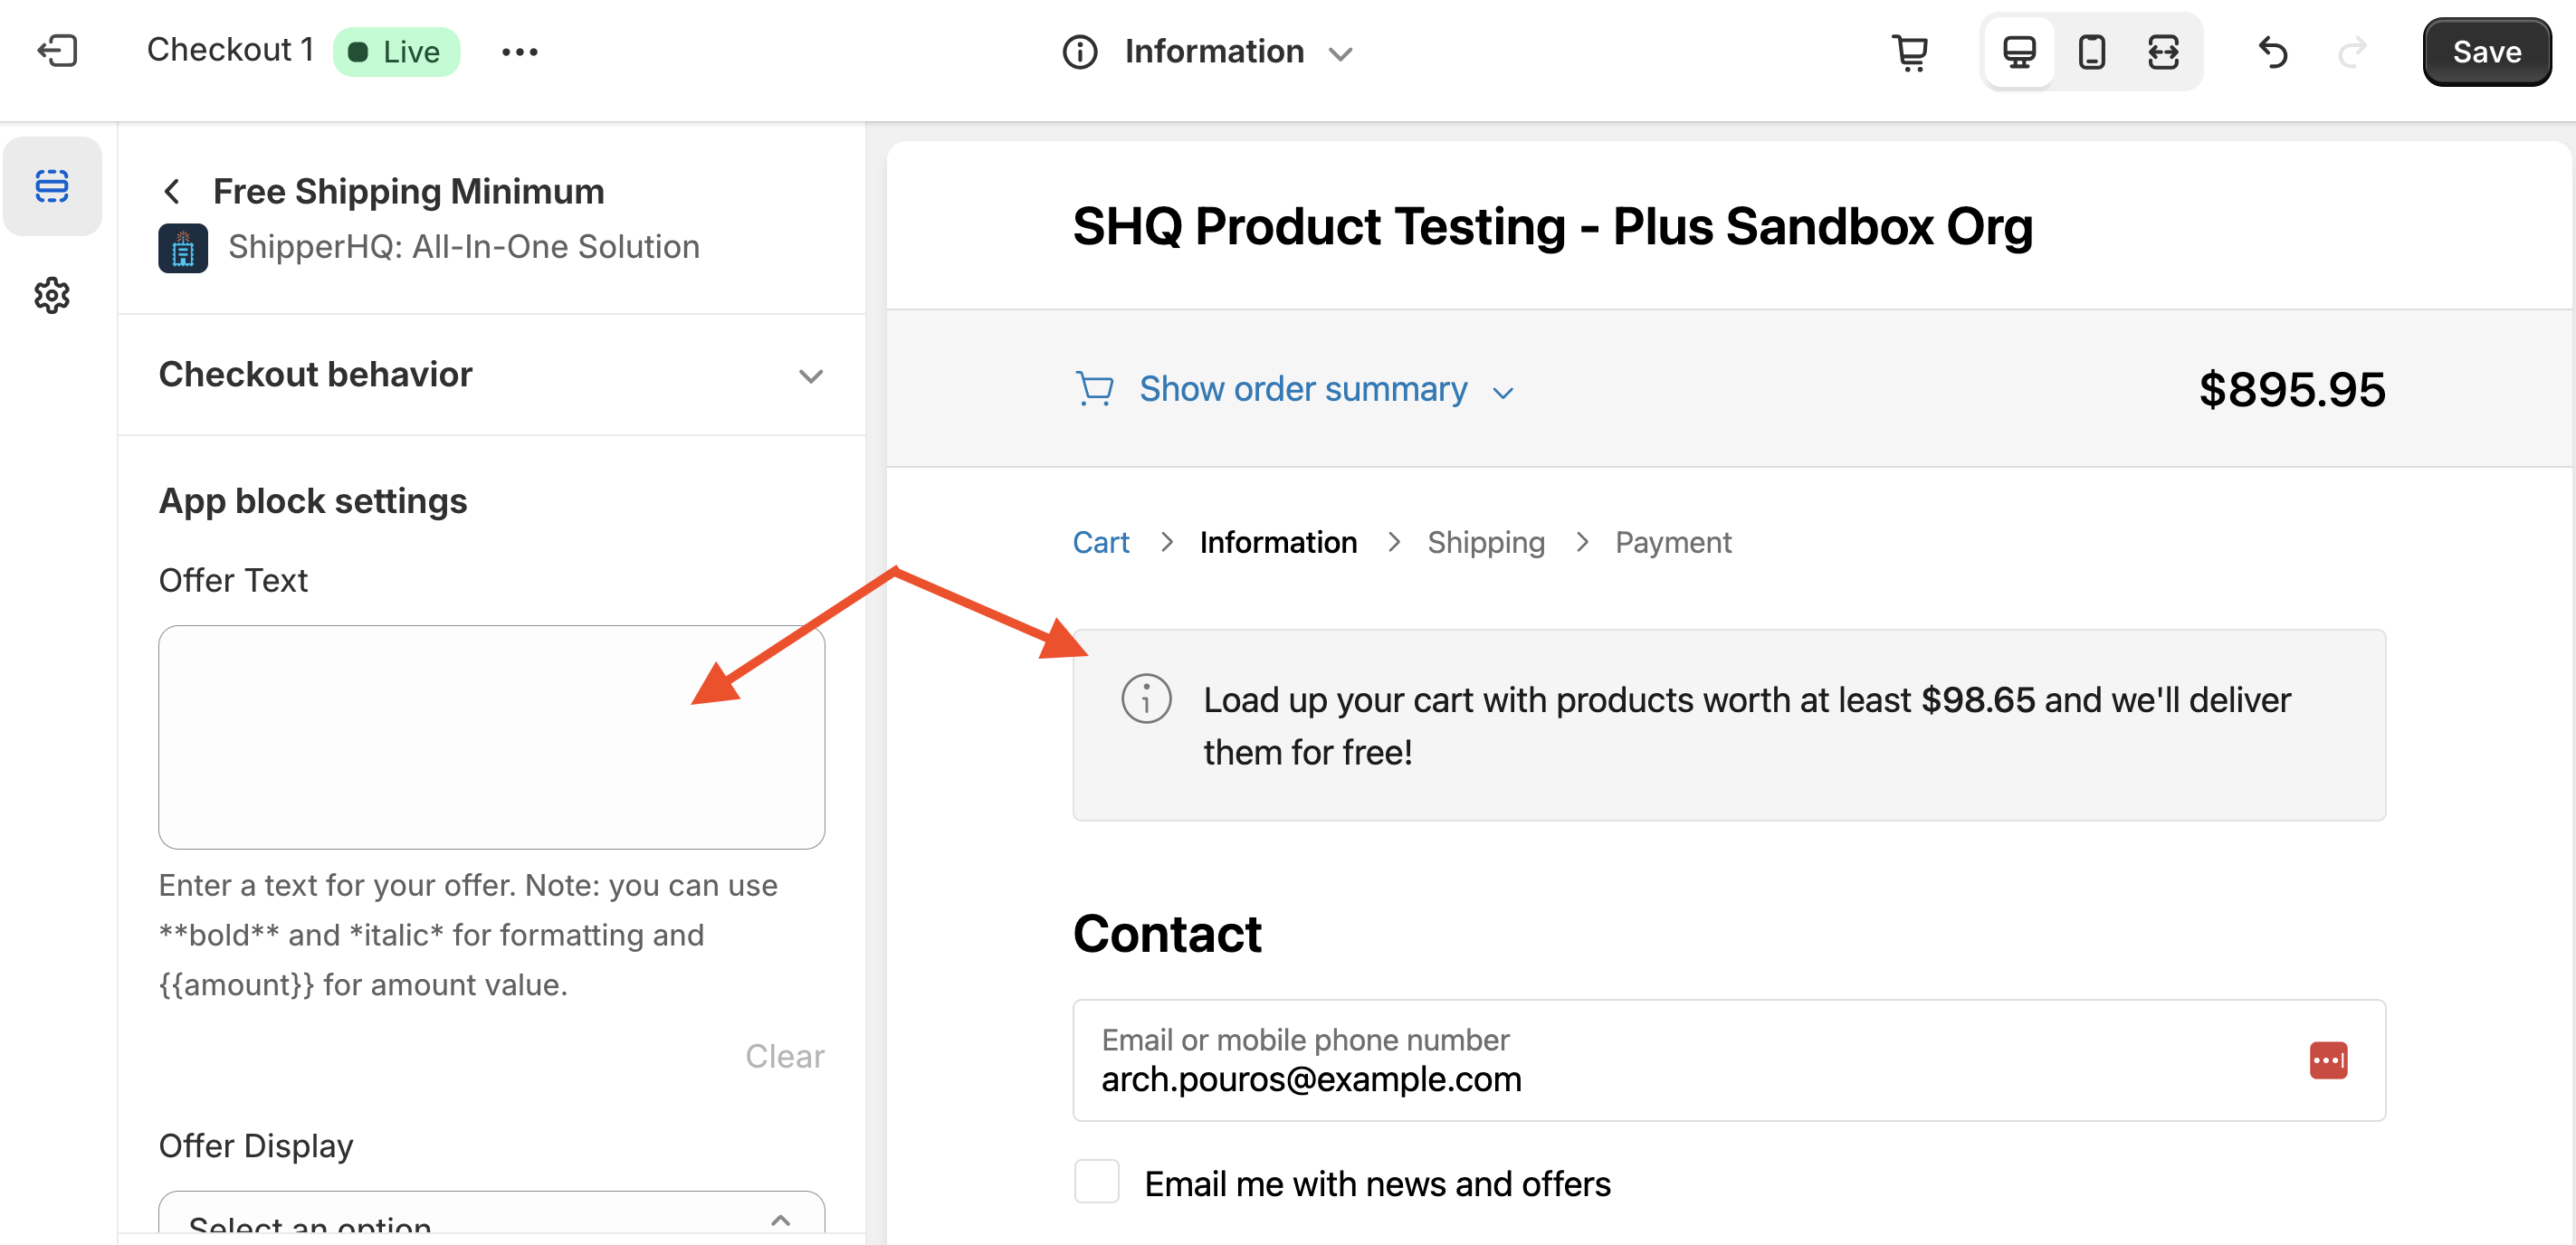
By adding text to the available field, you will see the check-out block updated with your new details.
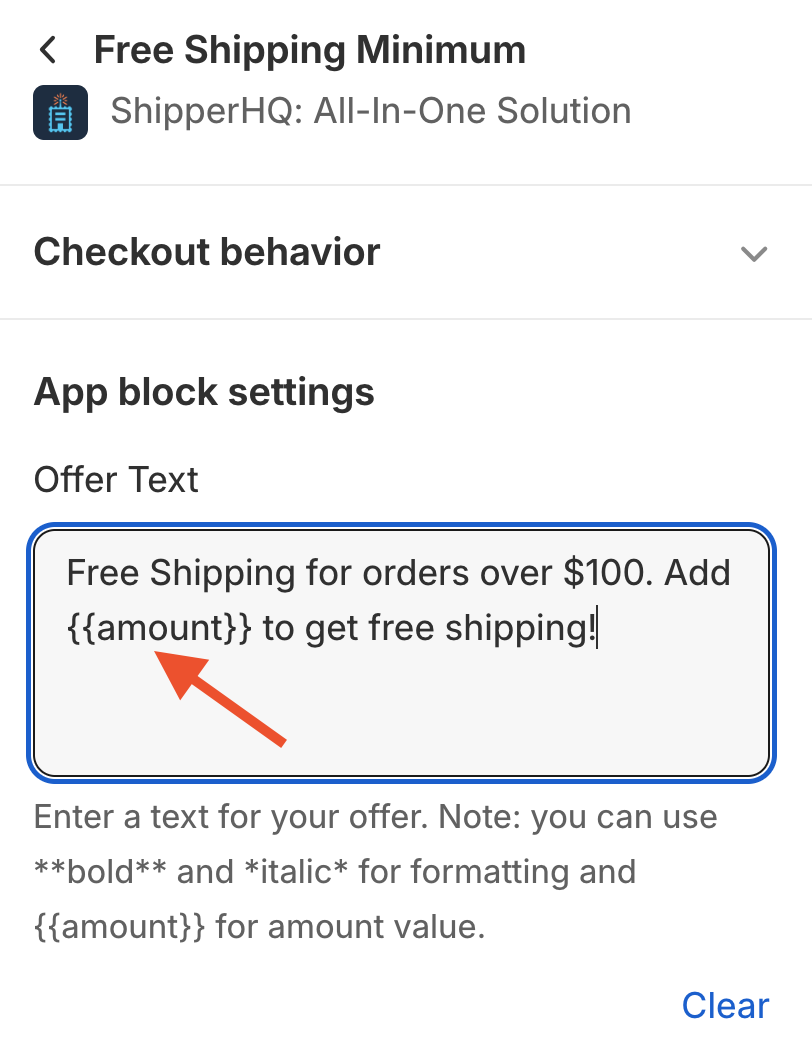
You will want to make sure your text includes the following, variable tag: {{amount}}
For example, we might use the following text:
“Free shipping for orders over $100. Add {{amount}} to get free shipping!”
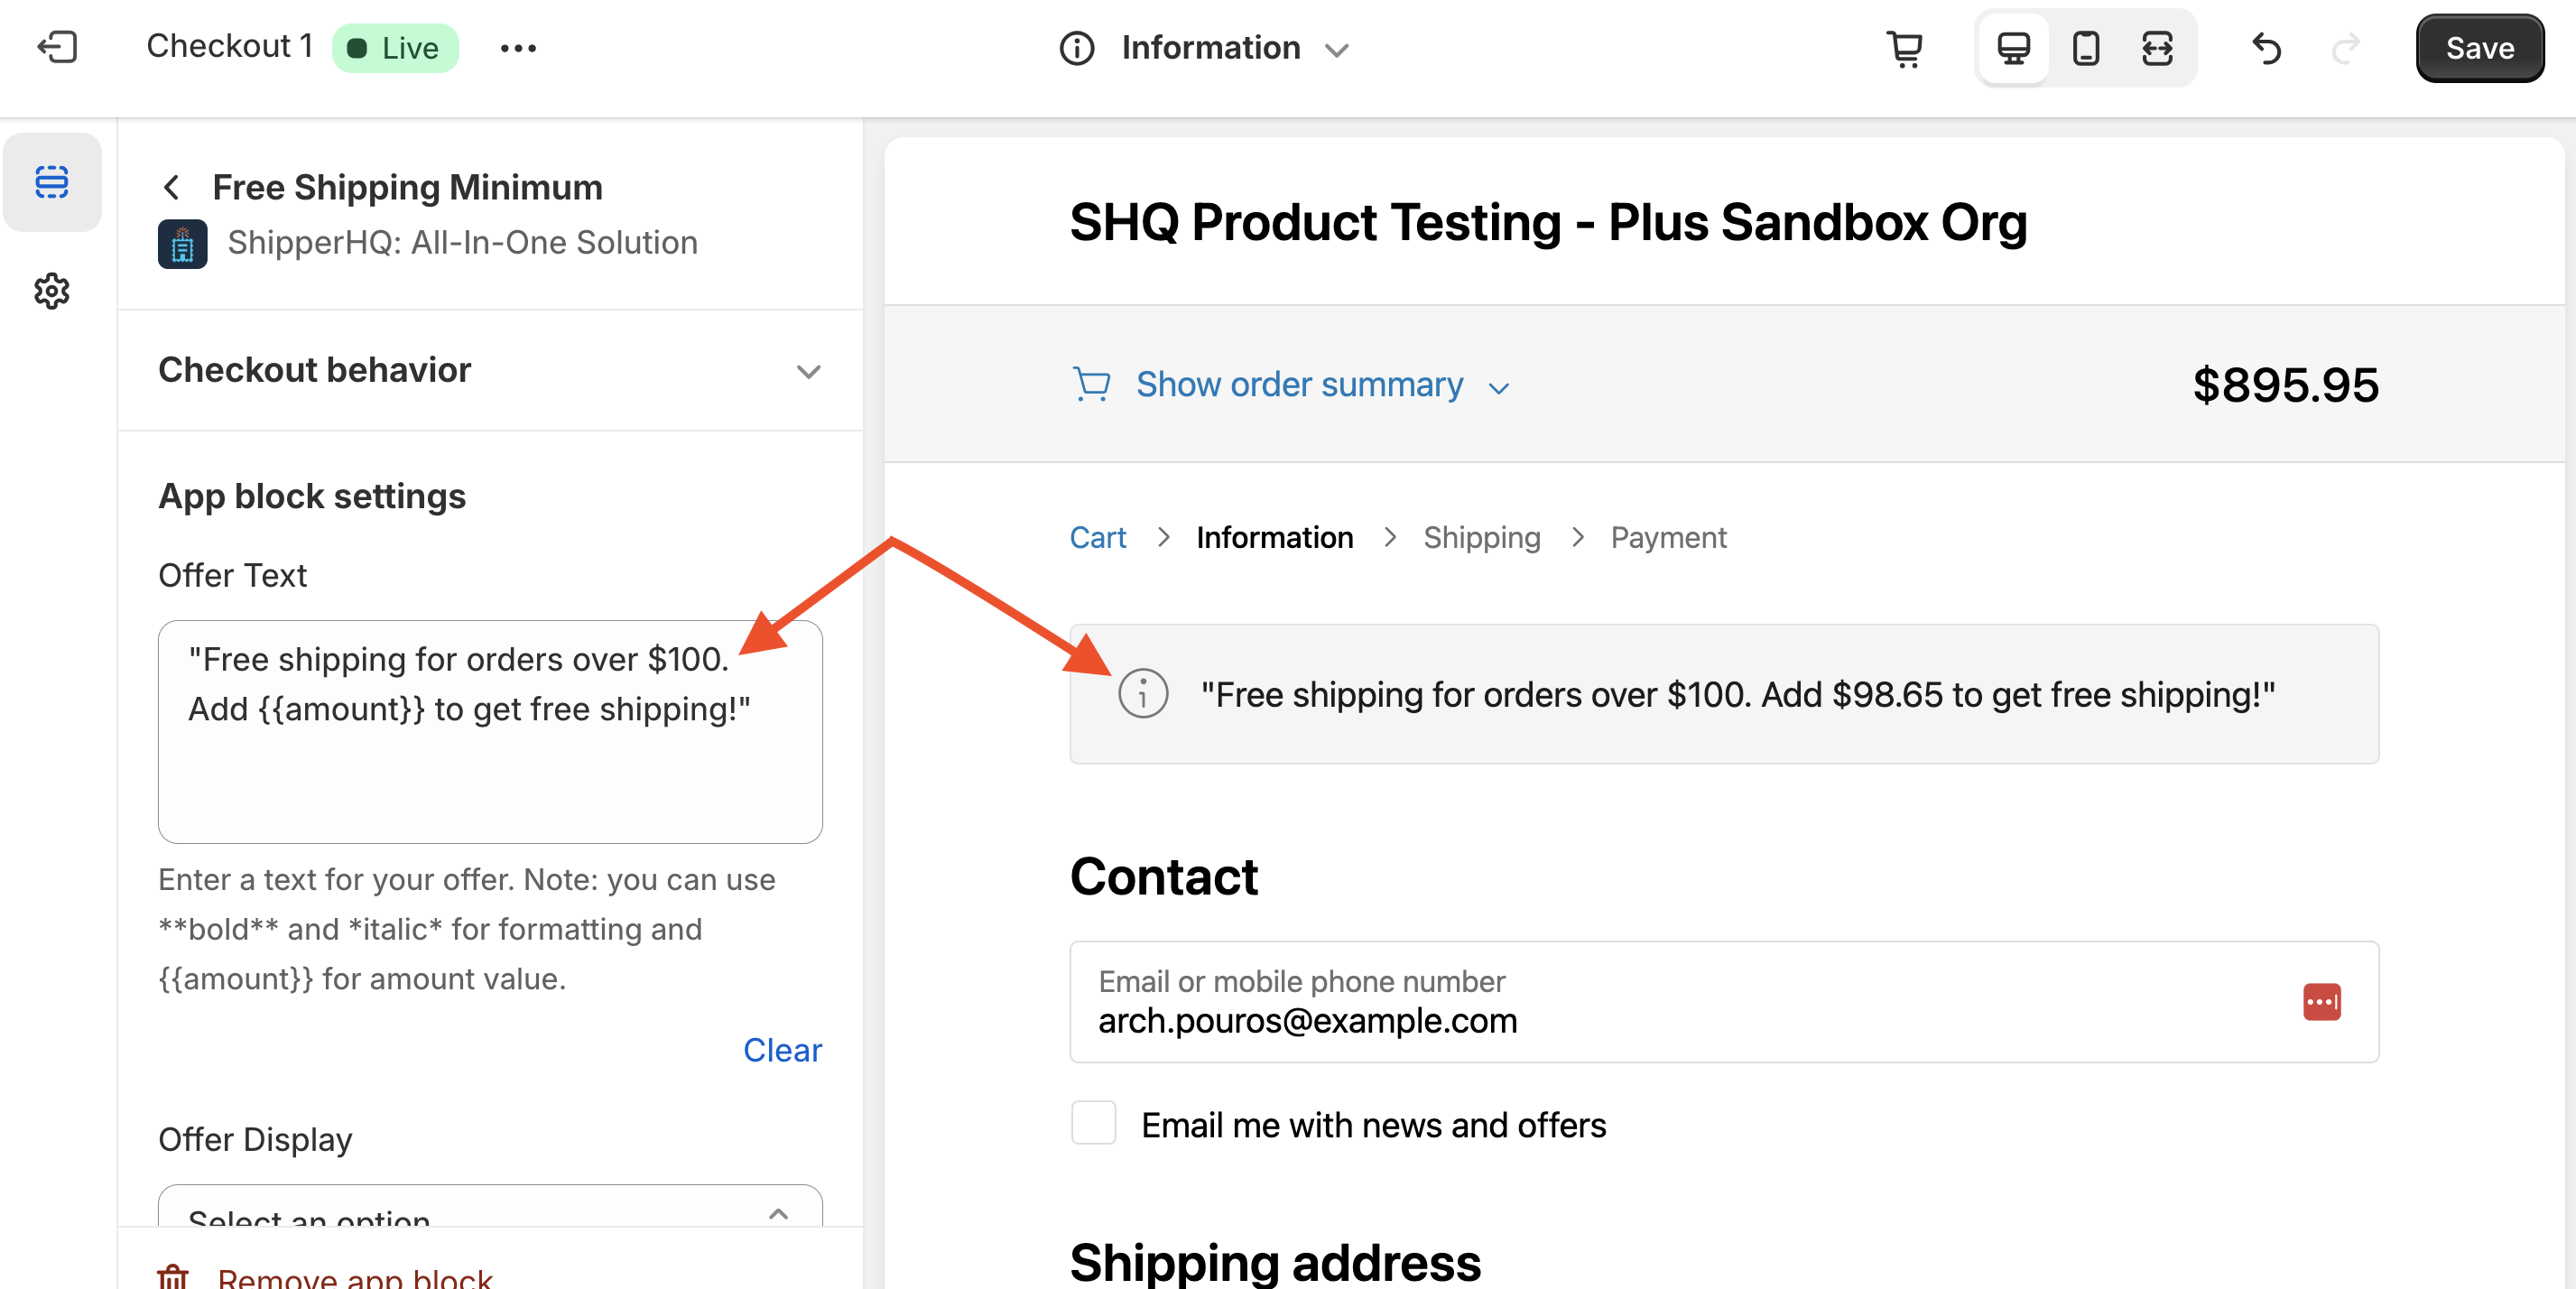
The variable tag, {{amount}} will count down the total amount needed to reach Free Shipping based on the free shipping threshold in your ShipperHQ Shipping Rule.
There are also available settings for how the checkout block will be displayed. Options include Banner-style, as a block, or simply display as plain text.
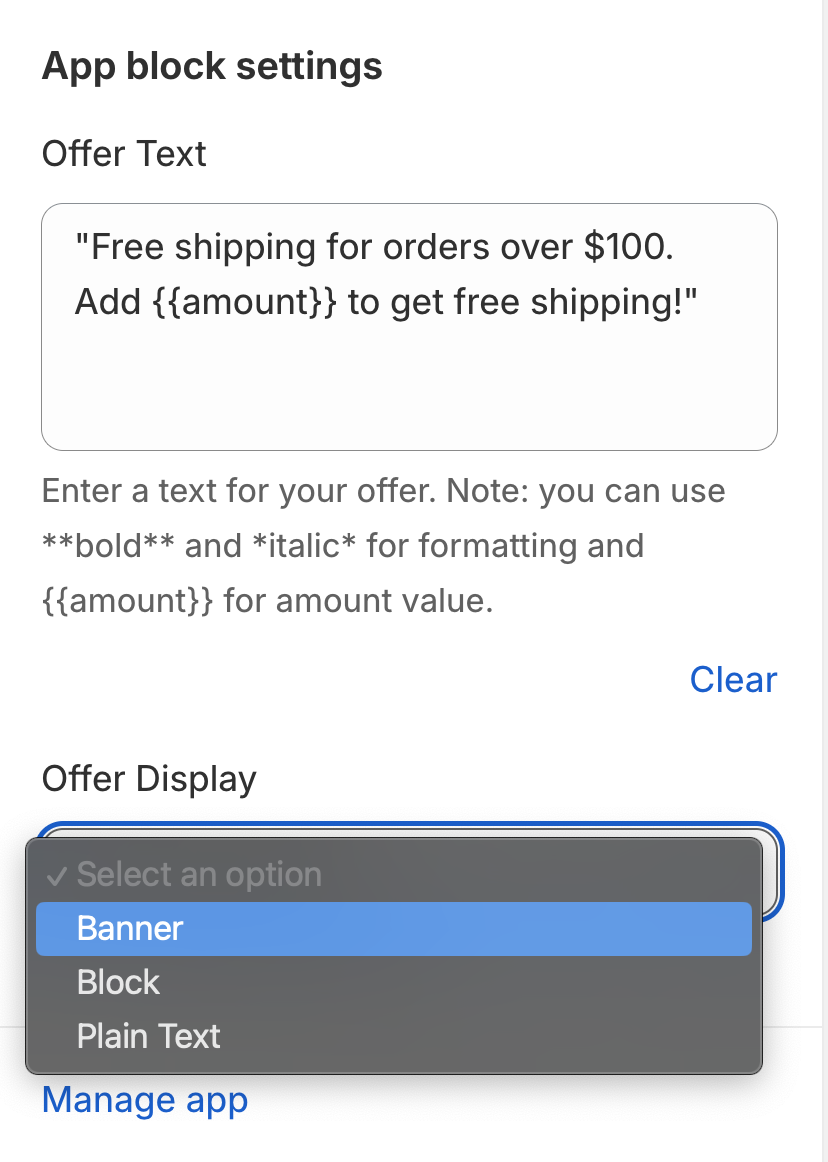
Once these settings have been applied, you can preview your site by adding products to the cart and continuing to checkout.
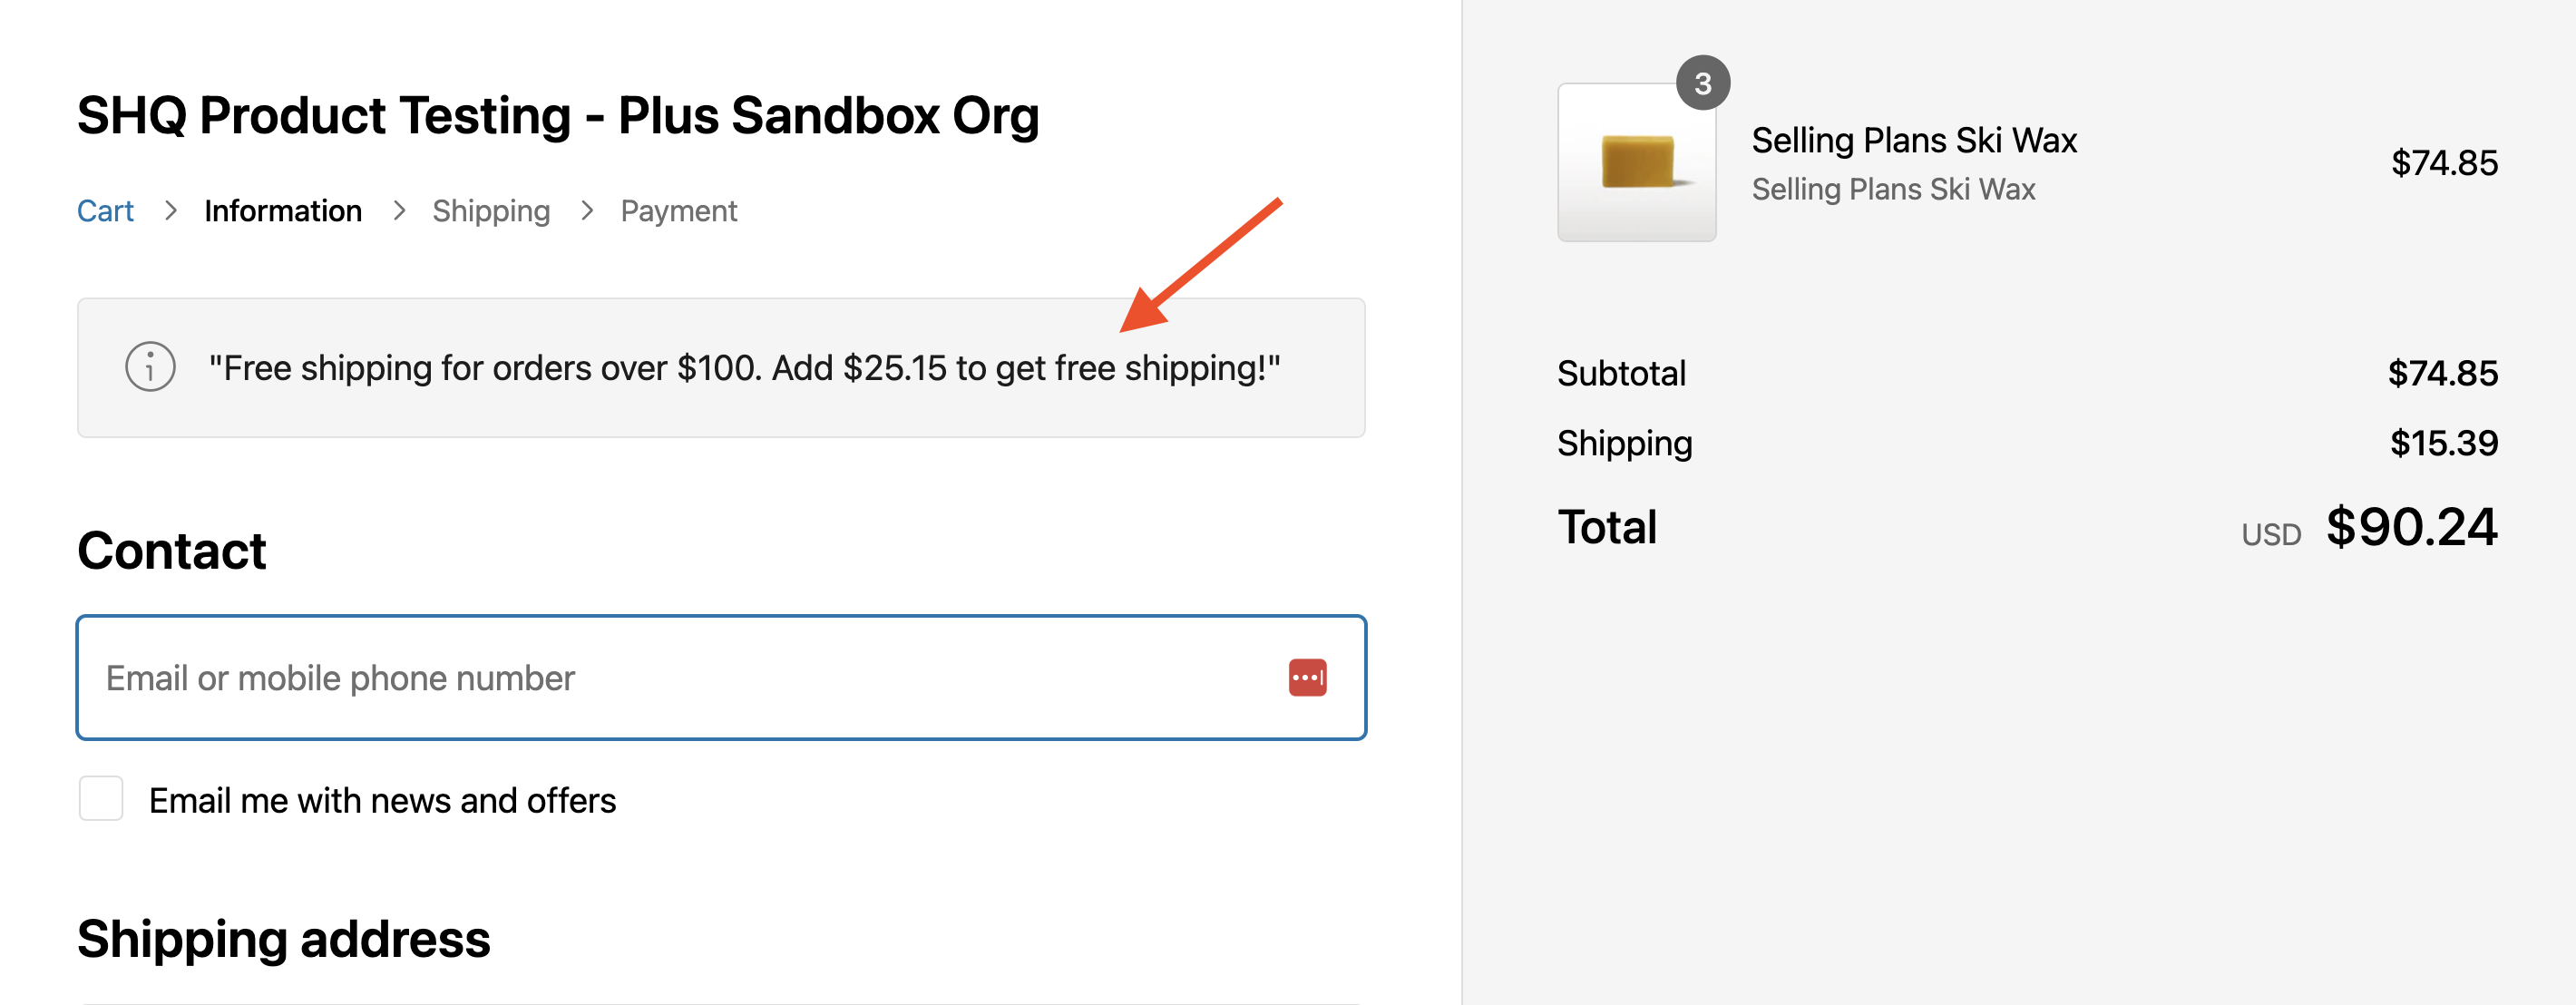
Once the minimum order amount is reached and the customer qualifies for Free Shipping, the checkout block is removed and the shipping amount displayed in the preview will be updated to Free.
Special formatting Options
You can also apply special formatting in the promotional text to bring more focus to the incentives being offered.
A list of custom formatting options is provided below. These can be added to the text entered in the Offer Text field and displayed on the checkout page.
Supported Format Options
- Bold Text: Using the double asterix, (**) around your checkout block text or around specific areas of text, you can draw attention to the incentive. For example, using the following will BOLD all text in the block:
**Free shipping for orders over $100. Add {{amount}} to get free shipping!**
- Italic Text: Similar to the approach above, using a single asterix (*) before and after any selected text can be used to italicize the text. For example, using the following will change the text to Italic for the text listed in the block:
*Free shipping for orders over $100. Add {{amount}} to get free shipping!*
Another option is to combine both the Bold and Italics tags within the text to make the call to action even more appealing. For example:
**Free shipping** for orders over $100. Add *{{amount}}* to get free shipping!
For more information or technical assistance, please contact us!