
Table of Contents
- How It Works
- Requirements
- Installing the ShipperHQ App
- Features and Use Cases
- Troubleshooting and Support
- FAQ
ShipperHQ integrates directly with Shopify to replace the platform's default shipping rates with live, rule-based rates from the carriers and configuration you define. Whether you want to offer real-time UPS and FedEx rates, restrict methods by product type, charge handling fees, or display delivery date options at checkout, ShipperHQ gives you the controls that Shopify's native shipping doesn't.
On Shopify Plus, additional features including Enhanced Checkout, Shipping Incentives, and Customer Tag Support unlock further checkout customization.
Already using ShipperHQ on another platform? See Migrating ShipperHQ Between Platforms before proceeding.
How It Works
ShipperHQ is an app installed directly in your Shopify store. Once installed, it connects your store to the ShipperHQ dashboard where your carriers, rules, and configuration live. It also adds product metafields (shipping properties) to your Shopify dashboard, which are used to assign shipping groups, origins, and packing rules to your products.
ShipperHQ is automatically added to your Shopify shipping zones on install. This controls which destinations ShipperHQ is active for.
When a shopper reaches checkout, Shopify sends a rate request to ShipperHQ containing the cart contents, destination, and other order details. ShipperHQ evaluates that request against your carrier connections, shipping rules, and product attributes, then returns the matching rates to display at checkout. Destinations not covered by a Shopify zone that includes ShipperHQ won't receive ShipperHQ rates.
Requirements
- A Shopify plan with 3rd party carrier-calculated shipping (CCS) included. See Third-party shipping carrier accounts and availability (Shopify) for eligible plans.
Note: After CCS is enabled on your Shopify plan, there may be a delay of up to 24 hours before it reflects on your account.
Setting Up the ShipperHQ App in Shopify
In this section, you'll install the ShipperHQ app and complete the setup wizard. The wizard walks you through connecting carriers, configuring your origin, and other initial settings in just a few minutes. The more thoroughly you complete it, the more ShipperHQ will have auto-configured for you before you start customizing.
- Log into your Shopify store, and locate ShipperHQ in the App Marketplace. Click Install.
- In Shopify, click Install app and approve the billing subscription to start your 15-day free trial. You'll be redirected to ShipperHQ to complete your account profile.
- The setup wizard will walk you through configuring your origin, website, and carriers.
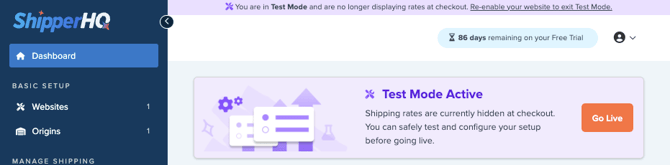
Once the wizard is complete, you will be brought to your freshly configured ShipperHQ dashboard. Your ShipperHQ account will be in Test Mode, so you can take your time in adjusting your configuration.
Going forward, you can access your ShipperHQ dashboard by typing "ShipperHQ" into the Shopify search bar. You can also access it by going to the ShipperHQ sign-up page, selecting Shopify, and authenticating with your .myshopify.com store URL.
When you're ready, use Test Your Rates to verify your configuration, then click Go Live in the dashboard banner to enable live rates for customers on your Shopify store.
Configuring ShipperHQ
With your app installed, configure ShipperHQ before going live. This includes adding your negotiated carrier account credentials, setting up shipping rules to restrict or adjust rates by product, destination, or order value, and enabling any advanced features included in your plan.
Mapping Shopify Product Attributes to ShipperHQ
If you're using shipping groups, origins, or packing rules in ShipperHQ, you'll need to assign those attributes to your products in Shopify using metafields. Without these assignments, ShipperHQ can't apply product-based rules correctly. If you don't have any product-based rules, this step is unnecessary.
See Assigning Product Attributes in Shopify for individual and bulk update instructions.
Shopify-specific Features and Use Cases
In addition to our core and advanced feature offerings, ShipperHQ also supports several features unique to our Shopify integration.
- Enhanced Checkout
- Shipping Incentives (Shopify Plus)
- Customer Tag Support
- Multi-Origin and Multi-Location Shipping
Enhanced Checkout
Enhanced Checkout unlocks additional checkout capabilities on Shopify Plus, including delivery date and time selection, pickup location options, and split-shipment display. It requires a unique access token from your ShipperHQ dashboard and is installed as a checkout block in Shopify's checkout editor.
See How to Set Up Enhanced Checkout on Shopify for more details.
Shipping Incentives (Shopify Plus)
Shipping Incentives adds checkout banners that display a shipping deadline countdown or a free shipping progress bar. These are installed as checkout blocks and require the Delivery Date & Time and Shipping Incentives advanced features to be enabled in ShipperHQ.
See Shipping Incentives Features for Shopify Plus for more details.
Customer Tag Support
ShipperHQ reads Shopify customer tags and maps them to customer groups, allowing you to apply different shipping rules for different customer segments, such as wholesale buyers, loyalty tiers, or B2B accounts.
See Shopify Customer Tag Support for more details.
Multi-Origin and Multi-Location Shipping
ShipperHQ's Multi-Origin feature allows you to calculate rates based on which warehouse or fulfillment location a product ships from. For Shopify Plus merchants using inventory locations, you can also apply cart-level surcharges or discounts across multi-origin shipments.
- Adjust Shipping Rates Across Multiple Shopify Locations
- Shopify Multi Location Behavior with ShipperHQ
Troubleshooting and Support
If you have questions about Shopify features, functionality, or setup, please check the FAQ section to see if your issue is described.
If rates aren't returning as expected, start with How to Troubleshoot Shopify Requests. It covers the most common causes including missing product attributes, Shopify Shipping Profile conflicts, unauthorized app permissions, and how to capture diagnostic logs for support.
FAQ
Can ShipperHQ be installed on a Shopify development store?
Yes. ShipperHQ can be installed on a development store without accepting billing. However, once the store is converted to a production store, ShipperHQ will not function until billing is accepted.
Does ShipperHQ work on all Shopify plans?
ShipperHQ requires third-party carrier-calculated shipping (CCS), which is not available on the Basic Shopify plan. See Third-party shipping carrier accounts and availability (Shopify) for current details on what plans include this feature.
Rates from ShipperHQ aren't showing at checkout. Where do I start?
First, confirm ShipperHQ is added to your Shopify shipping zones for the destination you're testing, and that Automatically include new services when they become available is enabled in the zone settings. The app won't return rates for zones it hasn't been added to, or include new carriers if the setting is unchecked. If the zone is set up correctly, check that at least one carrier is active in ShipperHQ.
- Go to Settings › Shipping and delivery › General shipping rates.
- Select Add rate, choose Carrier or App Calculated, and select ShipperHQ (Rates provided by app).
- Check Automatically include new services when they become available and save.
- Repeat for each zone.
Note: Shopify shipping zones are separate from ShipperHQ shipping zones. Shopify zones control which destinations the app is active for; ShipperHQ zones control how rates are calculated. Both need to be configured for rates to appear correctly.
If rates still aren't showing, there may be an issue with your ShipperHQ configuration. Check No Shipping Methods at Checkout (Diagnosing Shipping Rate Issues). For Shopify-specific troubleshooting, see How to Troubleshoot Shopify Requests.
Why aren't my shipping rules that worked on another platform working after migrating to Shopify?
Shopify uses metafields for product attributes, so shipping groups, origins, and packing rules need to be reassigned after migration. They do not carry over automatically. See Assigning Product Attributes in Shopify to reassign attributes to your products.
Can ShipperHQ control the order that shipping methods appear at checkout?
No. Shopify controls the display order of shipping methods at checkout, and ShipperHQ does not have the ability to change it. Shopify typically sorts methods by price, lowest to highest.
What is the "_shq_cart_id" field I see in Shopify order details?
This is a metadata field ShipperHQ adds to orders to link order data back to the ShipperHQ rate request. It's used internally for shipping insights and support diagnostics and doesn't affect order processing or fulfillment.
How do I charge for freight accessorials on Shopify?
While Shopify does not natively support freight accessorials (such as liftgate, residential delivery, or inside delivery) at checkout, it is possible to apply charges automatically through ShipperHQ by creating duplicate carrier methods. See How to Support Freight Accessorials on BigCommerce and Shopify.
How does ShipperHQ work in conjunction with Amazon Multichannel Fulfillment (MCF) or Buy with Prime with my Shopify store?
Unfortunately, ShipperHQ rates cannot be applied to orders placed through Amazon's Multichannel Fulfillment or Buy with Prime checkout flows. ShipperHQ is designed to calculate rates based on the order data made available through Shopify's standard checkout flow. Since these integrations bypass the standard checkout flow, ShipperHQ is unable to detect the order data and apply the appropriate rates.
Additional Resources
- Assigning Product Attributes in Shopify
- How to Troubleshoot Shopify Requests
- How to Set Up Enhanced Checkout on Shopify
- Shipping Incentives Features for Shopify Plus
- Shopify Multi-Location Behavior
- Shopify Customer Tag Support
- How to Support Freight Accessorials on BigCommerce and Shopify
- How to Test Your Rates in ShipperHQ
- Different Shipping Rates After Moving eCommerce Platforms