Set Rate as Fixed Shipping Fee Set on the Product
Set custom per-item shipping rates using ShipperHQ for eCommerce platforms
Overview
In some eCommerce platforms, you can set a specific shipping charge directly on the product. For example, in Magento, this field is called "Shipping Fee," while in BigCommerce, it's known as "Fixed Shipping Price."
With ShipperHQ, you can define how and when this Shipping Fee is used as the Shipping Rate. You may have products with different flat rates like $10, $12, or $15 per item. The Shipping Fee feature lets you set these values on the product and use them in ShipperHQ.
Table of ContentsPrerequisites: We'll assume you've already set up at least one carrier in ShipperHQ and that your store supports shipping fees set on the product listing.
Supported Platforms
- Magento 1
- Magento 2
- Adobe Commerce
- BigCommerce
- Zoey
The use of this setting requires support from the eCommerce platform and a ShipperHQ Started Plan or higher.
Setup
Shipping Group Creation
In ShipperHQ, create a new Shipping Group named "PER_ITEM." This will make the group easy to identify while assigning it to your products and allows ShipperHQ to read the Fixed Shipping Price attribute assigned to your product(s).
Shipping Rule Setup
- From the left navigation menu in your ShipperHQ dashboard, select Shipping Rules.

- In the upper right corner of the shipping rules page, click Settings to access ShipperHQ's advanced shipping rule settings.

- Under the Advanced Settings section, go to the Apply Actions tab and set Product Listing Shipping Fees to Yes then click Apply to save the new setting.

- Create a new Shipping Rule once you are back on the Shipping Rules Page.

- Select Override Rates for the rule type to be created.

- Enter a value for the flat rate to be applied and set the flat rate to be applied Each Item Within a Shipping Group then click Apply.
We'll use $10 for this example.

- Select any shipping methods you want to override with the flat rate.
For this example, we'll use UPS Ground.

Click Continue to move forward with the setup of this rule.
- Select Shipping Groups for the condition to be used in this rule and click Continue once more to proceed.

- You will now be prompted to enter the shipping group to be used for this rule.
In the first drop-down, select Any Selected Shipping Groups are in the Cart then select the PER_ITEM shipping group in the next field.
If you have not yet created the shipping group, you can do so at this stage by clicking I Want to Create a New Shipping Group.

- After selecting the shipping groups and proceeding, a summary of the shipping rule will be displayed.
Be sure to add a title for the new rule so that it can be easily identified in the shipping rules list and during testing.

- Click Finish to save the new rule. This will apply the rule immediately.
Once the rule is created, we recommend using the “Test your Rates” feature to confirm the new rule is working as expected.
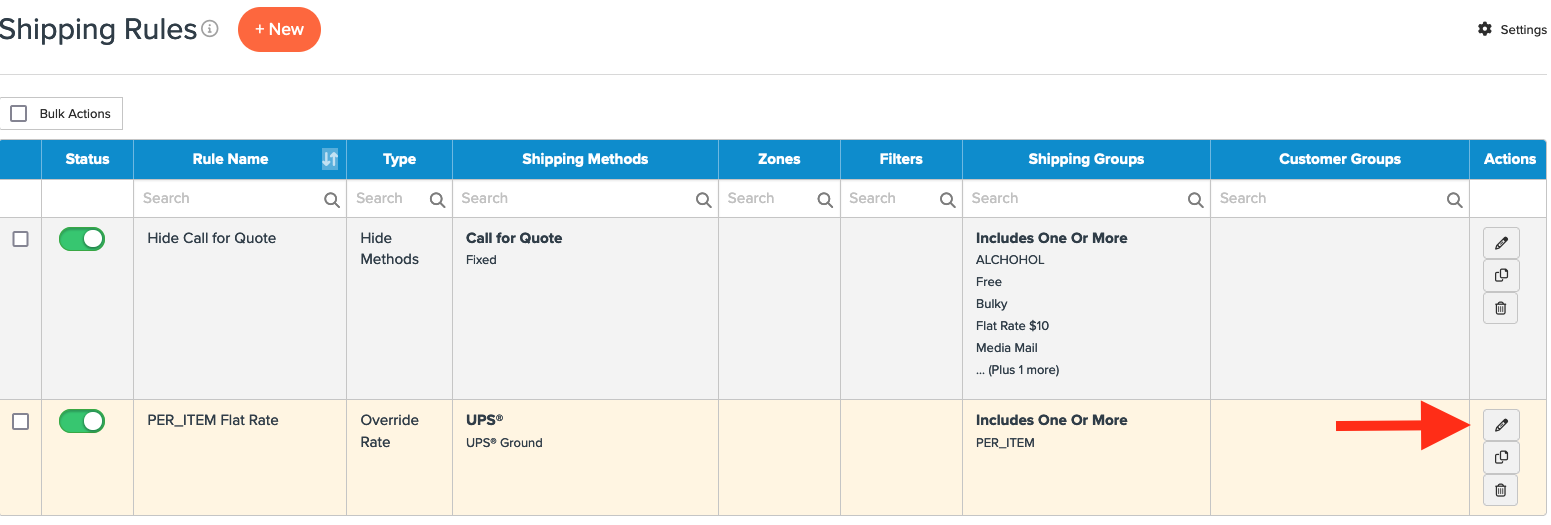
- To complete the rule configuration, return to the shipping rules page and locate the new rule.
Tip: The newest shipping rules can be found at the end of the list.
Click the edit icon or click the rule itself and you will be taken to the rule settings.

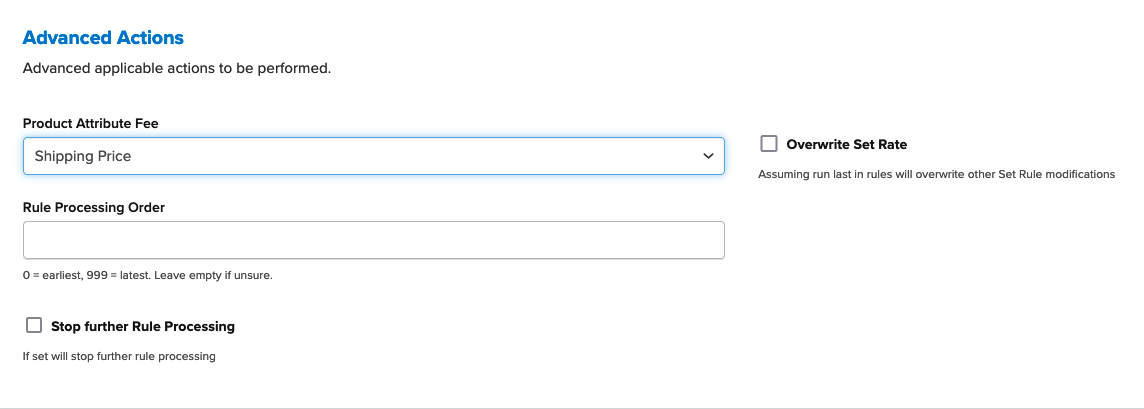
- Navigate to the Advanced tab and locate the Advanced Actions field.
Select Shipping Price in the Product Attribute Fee dropdown and then Save the rule once more.

⚠️ For merchants on Magento 1/2, Adobe Commerce, and Zoey, there is also an option for "Handling Fee" which works in the same way as "Shipping Fee."
⚠️ For merchants on BigCommerce, if you migrate from ShipperHQ standard app to ShipperHQ Plus remove values in Fixed Shipping Fee (Product → Shipping Details) or ShipperHQ rates won’t return. Ensure product has metafield key shipperhq_shipping_fee via Metafield Editor.
Conclusion
Once completed, ShipperHQ will apply the flat rate defined in this rule for the selected shipping methods whenever a product with the assigned shipping group is in the cart.
Ensure that any products with a fixed shipping fee have both (A) The appropriate shipping set on the product, and (B) the shipping group PER_ITEM assigned to the product.
After completing the above steps, any product with the Shipping Fee set on the product that is assigned to the PER_ITEM shipping group will be charged the amount in the Shipping Fee field.