- Overview
- Getting Started
- Enabling the Enhanced Checkout in BigCommerce
- Suggested Post-installation Actions
- Optional Post-install Checks
- Troubleshooting
- Theming BigCommerce Checkout
Overview
Enable Enhanced Checkout on BigCommerce to provide a better shopping experience. This feature allows customers to select pickup or delivery dates, offers in-store pickup options with map and store info, and updates your overall checkout experience.
💡 This feature is currently available only to ShipperHQ Enterprise customers. Please note that split checkout, freight accessorial selectors, address type selector, and custom carrier fields are not supported at this time.
Getting Started
Contact ShipperHQ to gain access to the ShipperHQ Plus App for BigCommerce, offering exclusive features and services for Enterprise customers.
Enabling the Enhanced Checkout in BigCommerce
After installing the ShipperHQ Plus App, follow these steps:
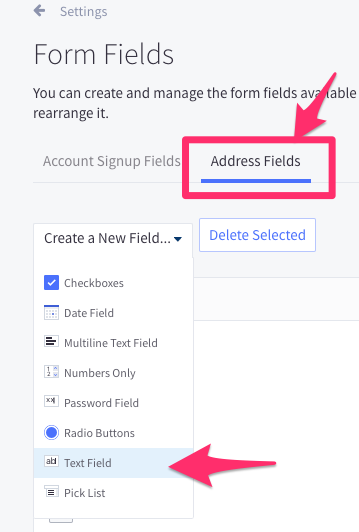
- Add the custom address fields:
- Visit Settings > Advanced > Account Signup Form
- Select the "Address Fields" tab
-
Choose Text Field type and name it SHQ_UPDATE_HASH
-
Choose Text Field type and name it SHQ_DELIVERY_DATE
-
Choose Text Field type and name it SHQ_TIME_SLOT
-
Choose Text Field type and name it SHQ_PICKUP_LOCATION
- In the ShipperHQ Plus app, go to Advanced Features, scroll down, and toggle the Enhanced Checkout feature to "Active".

The Enhanced Checkout will install automatically into the checkout process. It typically takes around 5 minutes for the rating system to switch over.
- Once the Enhanced Checkout feature has been enabled, navigate to the Settings section. Within this area, you will have the option to toggle between version 1 (v1) - obsolete and version 2 (v2) of Enhanced Checkout. Make sure to select V2 of the integration, and ensure that the latest Script Tag is applied: Confirm Enhanced Checkout Script Installation

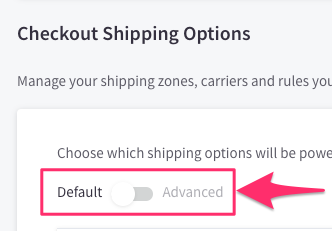
- Visit your BigCommerce Settings > Setup > Shipping Manager and ensure that the "Checkout Shipping Options" toggle is set to "Default".
Note: It may take up to 5 minutes for Enhanced Checkout to appear at checkout. During this time, rates might not be available.
Suggested Post-installation Actions
Hiding SHQ_UPDATE_HASH on the Signup Form
- Navigate to Storefront → Themes.
- Create a copy of the active theme by clicking Advanced.
- Edit the theme files, selecting
templates/pages/auth/create-account.html. - Find the text displayed below:
- Replace it with this:
-
{{#each forms.create_account.address_fields}}{{#if label '!=' 'SHQ_UPDATE_HASH'}}{{#if label '!=' 'SHQ_DELIVERY_DATE'}}{{#if label '!=' 'SHQ_TIME_SLOT'}}{{#if label '!=' 'SHQ_PICKUP_LOCATION'}}{{dynamicComponent 'components/common/forms'}}{{/if}}{{/if}}{{/if}}{{/if}}{{/each}}
-

Hiding SHQ_UPDATE_HASH on the Account Address Editor Page
- Repeat steps above for
templates/pages/account/add-address.html. - Find the text displayed below:
- Replace it with this:
-
<fieldset class="form-fieldset"><div class="form-row form-row--half">{{#each forms.address.shipping_fields}}{{#if label '!=' 'SHQ_UPDATE_HASH'}}{{#if label '!=' 'SHQ_DELIVERY_DATE'}}{{#if label '!=' 'SHQ_TIME_SLOT'}}{{#if label '!=' 'SHQ_PICKUP_LOCATION'}}{{{dynamicComponent 'components/common/forms'}}}{{/if}}{{/if}}{{/if}}{{/if}}{{/each}}</div></fieldset>
-

Hiding SHQ_UPDATE_HASH in Order Emails
- Go to Marketing → Transactional Emails.
- Find the text displayed below:
- Replace it with this:
-
{{#each order.billing.address.custom_fields}}
  {{#if label '!=' 'SHQ_UPDATE_HASH'}}
    {{#if label '!=' 'SHQ_DELIVERY_DATE'}}
      {{#if label '!=' 'SHQ_TIME_SLOT'}}
        {{#if label '!=' 'SHQ_PICKUP_LOCATION'}}

          <dt>{{label}}</dt>

          {{#compare value 'array' operator='typeof'}}
            {{#each value}}
              <dd>{{this}}</dd>
            {{/each}}
          {{else}}
            <dd>{{value}}</dd>
          {{/compare}}

        {{/if}}
      {{/if}}
    {{/if}}
  {{/if}}
{{/each}}
-
- Save changes to apply.

Optional Post-install Checks
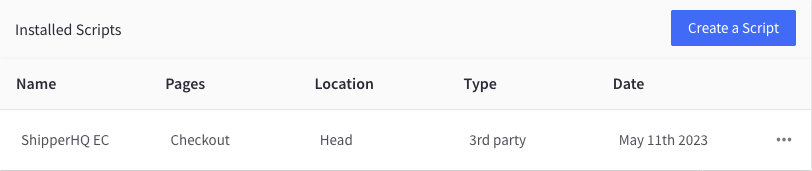
- Confirm Enhanced Checkout Script Installation: Go to Storefront > Script Manager and ensure the 'ShipperHQ EC' script is present.
- Confirm Shipping Insights App Extension: In BC admin, go to Orders and check for 'View Order In ShipperHQ'.

- Test the Checkout: Enter shipping details to ensure Enhanced Checkout is visible.
Note: This example is displaying a calendar. You will need to enable Delivery Date support for this to show.
Troubleshooting
Why am I not seeing rates, the Enhanced Checkout view, or anything beyond loading dots?
If rates don't appear after 5 minutes, try the following:
- Clear browser cookies and cache; restart checkout.
- Ensure "Checkout Shipping Options" is set to "Default" in Settings > Shipping Manager.
- Check for shipping errors in Settings > Store Logs. If errors exist, copy the "Quote ID" and contact ShipperHQ for support.
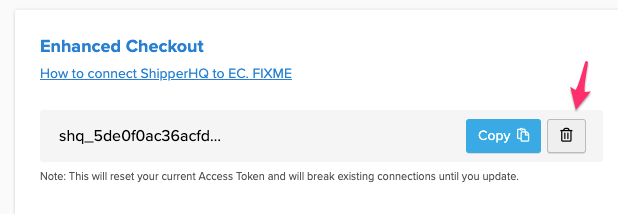
Enhanced Checkout does not appear
Go to the SHQ+ App, edit your website under the Websites tab, and generate a new EC token in the Integrations Tab.
Theming BigCommerce Checkout
You can theme BigCommerce checkout while using ShipperHQ's Enhanced Checkout by customizing the CSS. It's advisable to consult a development agency before altering any site code. Feel free to Contact Us for agency referrals if needed.